


Vertical Autoclave BAVT-303-B
- Sea, Air, Door to Door Shipping
- 1 Year Warranty
- US & European Standards
We offer a variety of vertical laboratory autoclaves for general purpose sterilization applications. Customers can choose from the range depending upon their application, volume and budgetary requirements. Features are designed specifically for lab based sterilizations used in research laboratories, pharmaceuticals, microbiology labs, food and chemical industries. High performance, reliable results and a longer life makes it an ideal choice.
- Microcomputer control system
- Unique anti scald design chamber for corrosion resistance
- Stainless steel chamber
- Five sterilization modes
Specification
Features
ApplicationsAccessories Optional Accessories
| Capacity | 80 L |
| Function | Fully automatic |
| Temperature Range | 5°C-138°C |
| Sterilization Temperature | 105-135°C |
| Warming Temperature | 45-60°C |
| Warming Time | 1-9999 min |
| Melting Temperature | 60-100 |
| Melting Time | 1-300 min |
| Humidity Range | 10%-85% RH |
| Working Pressure | 0-0.6 MPa |
| Chamber Dimension | 400x700 mm |
| Overall Dimension (LxWxH) | 620x680x1040 mm |
| Weight | 140/180 kg |
| Power | 4600 W |
| Power Supply | 220 V, 60Hz |
- Microcomputer control system
- Unique anti scald design chamber for corrosion resistance
- Stainless steel chamber
- Five sterilization modes
- User friendly control panel
- Multi layered pressure protection
- Fully automatic internal discharge control embedded with a steam trapping bottle
- Automatic checking of locking condition of cover
- Automatic sterilization according to preset time
- Safety device: Self-induction pressure interlocking device, over temperature protection system, dry scorch protection system, overpressure protection, safety valve, over current and short circuit protection, cover inspection system, leakage protection device, anti-scald safety protection and automatic troubleshooting system
Food industry, Chemical industry, Research, Laboratory, Pharmaceutical
| Accessory Code | Name |
| 1702806006 | Stainless steel baskets |
| 1702806007 | Drainage hose |
| 1702806008 | Exhauset bottle |
| Accessory Code | Name |
| 1702806009 | Printer |
| 1702806010 | Printing set |
| 1702806011 | Load thermometer |
| 1702806012 | Cooling fan |
| 1702806013 | Temperature controller |
| 1702806014 | Temperature sensor |
| 1702806015 | Pressure Sensor |
| 1702806016 | Heater |
| 1702806017 | Sealing ring |
| 1702806018 | Pressure gauge |
| 1702806019 | Stainless steel pail |
| 1702806020 | Relay |
| 1702806021 | Main board |
| 1702806022 | Display board |
| 1702806023 | Jiggle switch |
| 1702806024 | Handle |
| 1702806025 | Pressure switch |
| 1702806026 | Solenoid Valve |
Operating Manual for BAVT-303-B
1. Precaution on Safe Operation
2. About the Instrument
3. Installation of Autoclave
4. Operation Instruction
5. Maintenance
6. Troubleshooting
1. Precaution on Safe Operation
• To ensure the safe and correct use of the instrument, please read this manual carefully before use and operate according to the instructions in the manual. If it is not used according to the method specified by the manufacturer, the protection provided by the instrument may be damaged.• In addition to sterilization, drying and agar melting, the instrument shall not be used for other purposes; it shall not be used for sterilization of inflammable, explosive, oxide prone or strong acid, alkali, salt water and other substances, or it may cause corrosion of sterilization chamber and pipeline, or even explosion.
• During installation, it is required to connect correctly according to the power requirements on the instrument nameplate; if the voltage fluctuates too much, it is required to use a regulated power supply to ensure the best performance of the instrument; if other types of voltage are used, it is required to use a transformer, otherwise the instrument will be damaged.
• The instrument must be reliably grounded. Do not connect the ground wire of the instrument to the plastic pipe, gas pipe, telephone ground wire, lightning rod, etc.
• Do not let the object block the exhaust port on the safety valve, so as to avoid that the safety valve can not exhaust and relieve the pressure in case of abnormal situation.
• Before opening the chamber cover, make sure that the reading of the pressure gauge is "0 MPa"; when the pressure in the sterilization chamber is higher than "0 MPa", do not open the chamber cover and drain valve, otherwise it will cause high-pressure steam to spray out and hurt people.
• When adding distilled water into the sterilization chamber, do not leak the water into the control circuit, so as to avoid electric shock accident or other faults.
• When using cleaning or other bags, please put the bag in the stainless steel basket first, and then put it into the sterilization chamber, otherwise the accuracy of temperature may be affected.
• Pay attention to observe the temperature in the sterilization chamber. The temperature is high at the end of operation. When opening the cover, pay attention not to put your face and hands close to the sterilization chamber to prevent scalding caused by steam spraying. When taking out the articles from the sterilization chamber, wear heat insulation gloves. Since the liquid needs to be cooled for a certain time, when the sterilized liquid material is taken out from the sterilization chamber, it is necessary to confirm that the temperature has dropped to a sufficiently low level to avoid scalding.
• Distilled water must be used as sterilization water to avoid affecting the service life of sterilizer. When the instrument works continuously, it shall be ensured that there is an interval of more than 15 minutes for the instrument to cool down. Otherwise, the instrument will not be able to produce enough saturated steam.
• In case of any abnormal situation (such as abnormal sound, smell, smoke), turn off the power supply immediately, pay attention to observation, and contact the local dealer or our after-sales service department after the abnormal situation no longer continues.
• It is recommended to place a pressure steam sterilization chemical prompt card (hereinafter referred to as the chemical indicator card) on the sterilized substance for each sterilization. After a sterilization cycle, when the color change of the chemical indicator card coincides with the temperature and temperature duration to be represented, it indicates that the temperature and temperature duration reached have met the requirements of the sterilization Institute If necessary, sterilization can be carried out; otherwise, sterilization requirements are not met.
2. About the Instrument
1. Application• This series of products are used for sterilization of scientific research institutions, laboratory utensils, culture media and unsealed liquids or preparations.
2. Sterilization principle
• Steam is used as sterilization factor to kill loaded microorganisms. The main technical parameters of sterilization, such as pressure, temperature and time, are set and controlled by the program.
3.Types of microorganisms killed
• Using hot and humid high pressure steam as sterilization factor to kill loaded microorganisms, including spores of bacteria, spores of fungi, etc.
4. Product structure.
It is mainly composed of shell, sterilization chamber, sterilization door, built-in steam generator, pipeline system, temperature control system, pressure detection, safety interlock protection device and so on. The specification is preset and carried out automatically.
5.Normal working conditions
• Ambient temperature: 5 ℃~ 40 ℃
• relative humidity not greater than 85%.
• Atmospheric pressure: 70kPa~106kPa.
• Suitable for power supply AC220V±10%,50Hz/60Hz.
6. Transportation requirement
Instruments are not allowed to stand upside down, overlap, below is not allowed to put items, avoid rain, carefully handle, there should be anti-movement measures.
7. Storage requirement
• Ambient temperature:-20 ℃~ 55 ℃.
• Relative humidity not greater than 93%.
• An indoor or sheltered place free of corrosive gas and well ventilated
8. Service life
• It is recommened to use up to 8 years
9. Technical specifications
| Model | BAVT-302-B | BAVT-303-B | BAVT-304-B |
| BAVT-302-A | BAVT-303-A | BAVT-304-A | |
| Capacity(L) | 54L | 80L | 100L |
| Dimension(L*W*H,mm) | 460mmx542mmx1070mm | 620mmx682mmx1100mm | 620mmx682mmx1200mm |
| Chamber dimension(Dia*H,mm) | φ325mm x 728mm | φ405mm x 701mm | φ405 x 801mm |
| Rate power supply(w) | 2600W | 4600W | 4600W |
| Stainless steel basket | 3 | 2 | 3 |
| Water tank | Yes | ||
| Chamber material | S30408 | ||
| Sterilization temperature | 105℃~135℃ | ||
| Sterilization time range | 1min~6000 min | ||
| Melting temperature | 60℃~115℃ | ||
| Melting time range | 1 min ~6000 min | ||
| Warming temperature | 45℃~79℃ | ||
| Warming time range | 1 min ~9999 min | ||
| Exhaust Level | 6 levels | ||
| Exhaust mode | Fully automatic internal arrangement | ||
| Exhaustcollecting bottle | Built-in | ||
| Preset range of time | 1min~15days delay | ||
| Rated working pressure | 0.25MPa | ||
| Sterilization mode | Liquid mode Liquid with warming mode Solid mode Wrapped instrument mode Fabric mode Rubber mode Fast mode Waste mode Agar mode Self-defined mode Drying mode(Only for A series) | ||
| Special funtion | Using USB to store sterilization data ,printing set can print temperature, pressure,curve and F0 value | ||
| Controller | “Smart IIII” new microcomputer intelligent control system | ||
| Safety device | Self-induction pressure interlocking device, lid closing checking, over temperature protection, dry scorch protection system, over pressure protection,safetyvalve,over current and short circuit protection, leakage protection device,anti-scald safety protection, automatic troubleshooting system | ||
| Standard spare parts | Stainless steel baskets,waterplate,waste water bottle | ||
| Optional spare parts | Printer, printing verification kit, article thermometer, adjusting foot (gi36 / 54), external pure water pipe water inflow function, drug packaging material software | ||
Table 1
Note1: Only support FAT12/16/32USB flash driver,and less than 32GB.
Note 2: When selecting drug packaging material software, please refer to the description of special software for drug packaging material.
10.Appearance and Parts
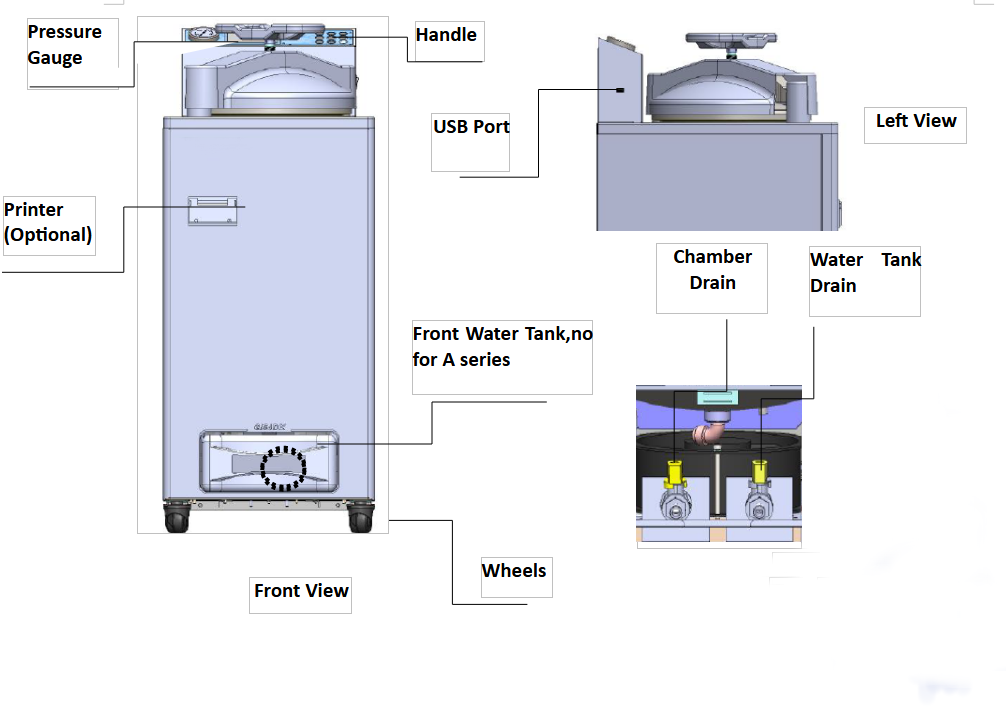
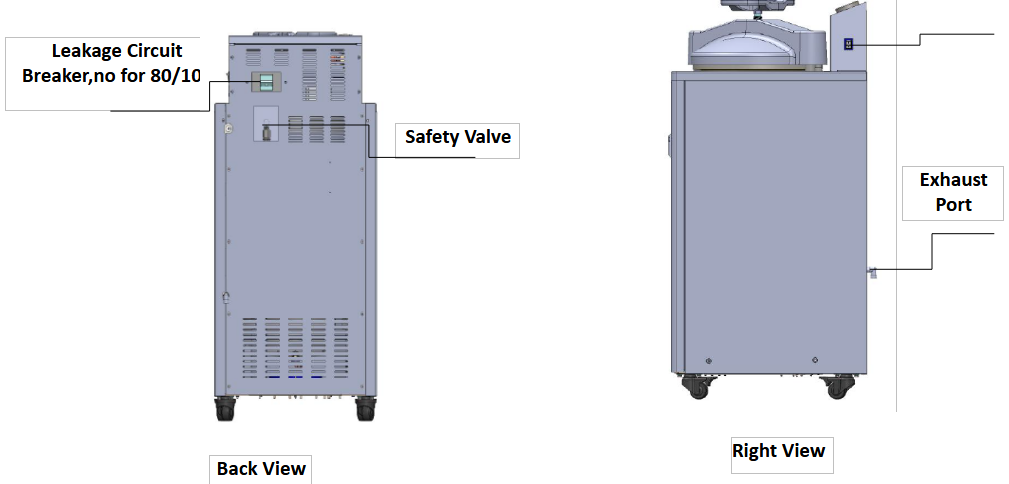
Power Switch,replaced by leakage circuit breaker for 80 & 100 L
Figure 1
11.Parts Function
1. Display Panel Function:
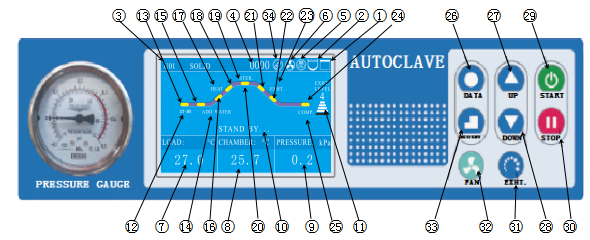
Figure 2
1.Lid interlocking icon:White when lid closed and locked, white and blinking when lid closed but not locked,red and blinking when lid is not closed.
2.Water level indicator icon:White when there is water in the chamber,red and blinking when lack of water.
Note:Available when there is automatic water feeding parts
3.Sterilization mode:Press UP/DOWN to choose the mode.
4.Ran cycle number:each time you press START,add 1 to the number.
5. Printer icon: this icon is available when the printer is selected. For more information on printer settings, see Chapter 4, "Setting of Administrator Menu."
6.Fan icon: when this function is on and when the chamber temperature is higher than 40 degrees, the fan icon will rotate and turn off automatically when the temperature is lower than 40 degrees. This function is default to be on.
7.Object temperature display:when this function is on, this area will show object temperature, when this function is off, here will show “---“.
8.Chamber temperature display: displays chamber temperature
9.When the pressure sensor is installed and function is on, the current pressure value is displayed here, when this function is off, here will show “---“.
10.The current status of the instrument: the working status of the current instrument is displayed here.
11.Exhaust level display: press "EXHT" key to adjust different exhaust level(volumn), divided into 6 levels: Level 0 to level5, level 0 means no exhaust, level 5 means full exhaust.
12.ST-BY: ST-BY will flash under standby condition.
13.Standby state indicator: yellow means static state, when the flow chart is blue indicates that the instrument is in the standby state, when the flow chart is red indicates the machine is in the heating state.
14.ADD WATER: when running the program, if there is water in the chamber, the flow chart between "ST-BY" and "HEAT" state is displayed in red, means the standby state goes directly to the heating state. If there is no water, the "ST-BY" state will switch to the "ADD WATER" state, and the word "ADD WATER" will blink, indicating that the instrument is adding water, and the flow chart between "ST-BY" and "ADD-WATER" is red.
15.Flow chart light of ADD WATER
16:Heating indicator 1, when this indicator is red, means machine is heating up and temperature is between room temperature and boiling point temperature.
17.HEAT:when HEAT is blinking, means instrument is in heating process
18.Heating indicator 2, when this indicator is red, means machine is heating up and temperature is between boiling point temperature and sterilization temperature.
19.Sterilization state indicator:red means machine is in sterilization process
20.STER.:When blinking and flow chart of this part in red means during sterilizing process, the temperature is the set sterilizing temperature.
21.Exhaust indicator 1:When this indicator is red, means instrument is during exhaust process, the sterilization is finished, current temperature is cooling down, between set sterilization temperature and boiling point temperature.
22.Exhaust indicator 2:When this indicator is red, means instrument is during exhaust process, the sterilization is finished, current temperature is cooling down, betweenboiling point temperature and open lid temperature.
23.EXHT:When blinking and flow chart of this part in red means during exhaust process
24.Cycle end indicator:red means whole cycle ends
25.COMP.:blinks and whole flow chart is red, means the whole cycle completes.
26.DATA button,press DATA button can check the data of current program.When setting the parameter, you can press DATA to exit without saving the modification.
27.UP button,under standby condition,press UP button can switch from U01to U02,U03 to U03…;when modifying the parameter, press UP can increase value,long press this button, can increase the value by 10 units.
28.DWON button, under standby condition, press UP button can switch from U02to U01,U03 to U02…;when modifying the parameter, press UP can decrease value,long press this button, can decrease the value by 10 units.
29.START button,used to start the work(press over 2 seconds)
30.STOP button, used to stop the work(press over 2 seconds).When the machine is inserted with USB flash drive, and under standby condition,long press this button can remove the USB flash drive.
31.EXHT button, used to adjust the exhaust volume,during the liquid mode, be careful to set a lower exhaust volume to avoid liquid overflow.
32.FAN button,when this function is on, and chamber temperature is over 40℃,the cooling fan will start working automatically, press FAN button can stop or restart.Not valid when this function if off.
33.SET/ENT button,used to set data and confirm. 1)under standby condition,press SET/ENT to enter into administer menu;2)when input the password,press SET/ENT to input next number;3)When modifying the data, first time press SET/ENT to enter into modifying condition, second time press to save the modification.
34:USB icon:will appear when inserted with USB flash drive;will not store the data when there is power off or mid-remove the USB.
2、Optional Spare Parts:
1)Load thermometer
2) Automatic water feeding parts
3)Printer and printing set
3. Installation of Autoclave
1. Placement of Autoclave1) This autoclave is precision instrument,during installation, place the autoclave on a flat ground and fix the wheels by pressing the breaker down.( If the ground is not flat, we can provide special wheels before purchasing) Do not place the autoclave in an environment with high humidity, direct sunlight and temperature less than 5℃ over 40℃。
2) Leave a certain space between the autoclave and the wall,it is suggested to keep 10cm between back and wall, and 20cm between sides and wall, to dissipate heat more fully.
3) Do not place the instrument under the fire alarm probe to prevent mid-alarming caused by the hot steam.
4) The exhaust port of the safety valve should not be close to the power supply outlet and should not be blocked.
2. Power Supply Connection
1) The instrument must be grounded reliably,if the power socket does not have the ground terminal, it is required to ground the instrument with independent ground wire before powered on.
2) Power supply:single -phase AC220±10%,50Hz/60Hz
Requirement for current intensity:
GI29/54 ································≥15A
GI80/100······························≥25A
If choose 2800W, the current intensity is 20A.
3) Connect the GI80/100 plug into a 3 pin industrial socket or power cord to air switch with power pack, of which, the red/brown wire connecting to live wire,green/blue wire to zero wire,yellow/green wire to earth wire.
Note:The specification of power supply supply should comply with the requirement on nameplate of the machine.No heavy article is allowed to place on power cord and the damage or exposure of power cord or loosening output lead may cause fire or electric shock.
3. Checking Package
Check the package before opening, take a picture if there is any damage. Open the box from the button(do not open the top), take out like a hat(shaken by two people from two sides). After opening the package, check if there is any damage of the machine, report to distributor or manufacturer.
4. Cleaning
1)Switch on the leakage protection switch and turn on the power, and then open the cover of sterilizer chamber,and take out the protective foams from the chamber. Clean the chamber and put the water plate and stainless steel baskets in.
2) Clean the foam scraps inside the sterilizer chamber completely to avoid blocking the pipeline.
5. Setting of Local Altitude
Before shipping, the machine has been set for an elevation between 0-300m, if the local elevation is over 300m, please reset the altitude or make sure proper usage of the machine.
4. Operation Instruction
I、Basic Sterilization Illustration &Operation Instruction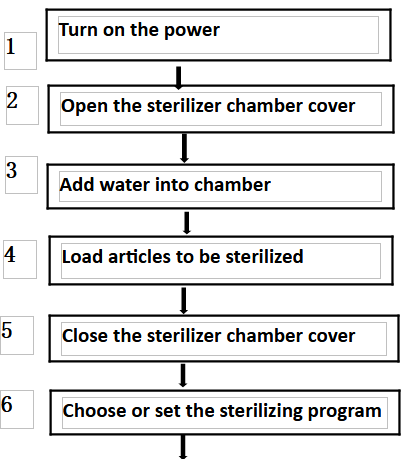
1、Turn on the power
●After turn on the power, the system will do the self-checking, screen will show”Select Account”, and send out long sound. After input the password, the screen will enter into the last time login interface.
●If the instrument is under standby condition, and no any operation within 30 minutes,the machine will enter into electricity-saving mode, and screen will go drak, press any button can restore the display.
2、Open the sterilizer chamber cover
●Turn the handle counter-clockwise until the lid is loosened, need to turn the handle until you can not turn, so to protect the sealing ring from dropping off.
●Push the handle rightward slightly to move the lid to one side
3、Empty the front water tank and add water into chamber
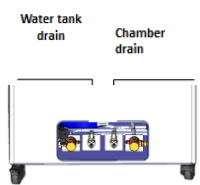
1)Check the front water tank of the instrument(Fig1),make sure the water level is under the high water level line, empty it if too high. If you don’t empty it, the water will come out from the back of the machine(Fig2) .
For A series, connect the external water tank with the exhaust tube,and make sure no water inside the external 10L water tank, the water in the chamber will be drain out to that tank before drying process.
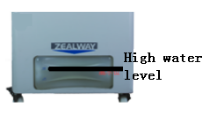
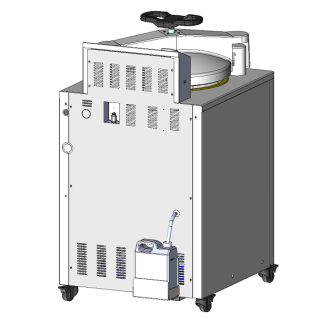
Figure 3
2)Add water into chamber manually
●Check the water level in the chamber, if you can not see water from the hole in the water plate, you should add water in, and the water should not be higher than the water plate.
3)Add water into chamber automatically ( need automatic water feeding parts)
●Change the water frequently, so as to protect the valves and pipes.
★Note:
○Do not open the drainage valve of chamber or drainage valve of inside steam collecting tank to avoid injury from the high temperature steam.
○The water level inside the chamber may decrease after each cycle, please add new water on time.Lack of water for a long time may cause damage to the heater.
○It is recommended to use distilled water with a electricity conductivity between 10~15us/cm,do not use well water, salt water or hard water,so as to prevent the chamber from corrosion,fouling and shortening the life of heater.
4、Load articles to be sterilized
●Take the baskets out, and put the articles to be sterilized into the baskets
●Put the water plate first, then put the baskets on the waterplate, do not put the basket directly on the heater.
5、Close the sterilizer chamber cover
●Push the handle leftword slightly until the arm leans against the arm stopper
●Turn the handle until it is secured and at the same time the door lock icon is white and not blinking.The handle must end in a position either horizontally or vertically, you can even loosen it a little bit to make it positioned horizontally or vertically.
Note:
○Before closing the cover, check if there are objects in or on the sealing ring, clean it to avoid damaging the sealing ring that may cause the steam leakage.
○Only when the lid close icon on the screen changes to white and not blinking, the machine will start to work.
6. Select/Set the sterilization program
(1) Selection method:
In the standby state as shown below, for symbols U01/U02…means the current program number, you can press UP and Down button to go to previous or next program. If you are happy with the current program, press START for 2 seconds to start the cycle.
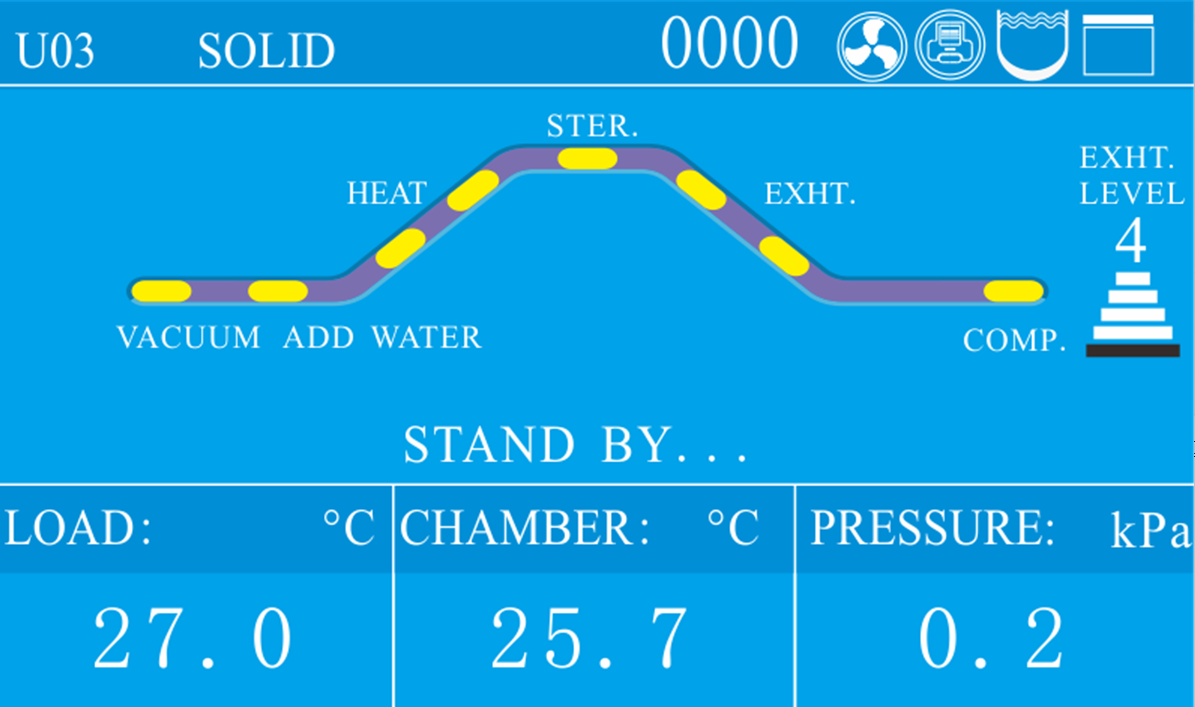
Figure 4
(2) Set the program
If you want to change program, under standby Press SET/ENT button to set the program.

Figure 5
When choose the program, if the current program is default program, you can choose the items to be sterilized first like below by UP/DOWN and SET/ENT:
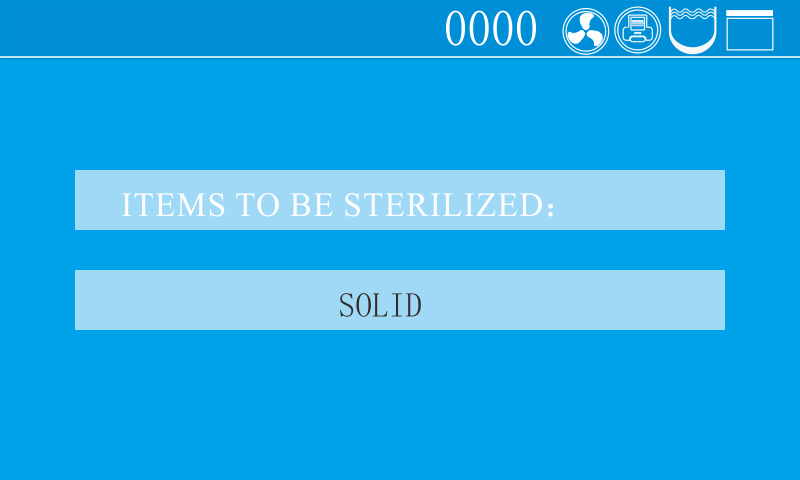
Figure 6
If the program is not a default program, the screen will show below words:
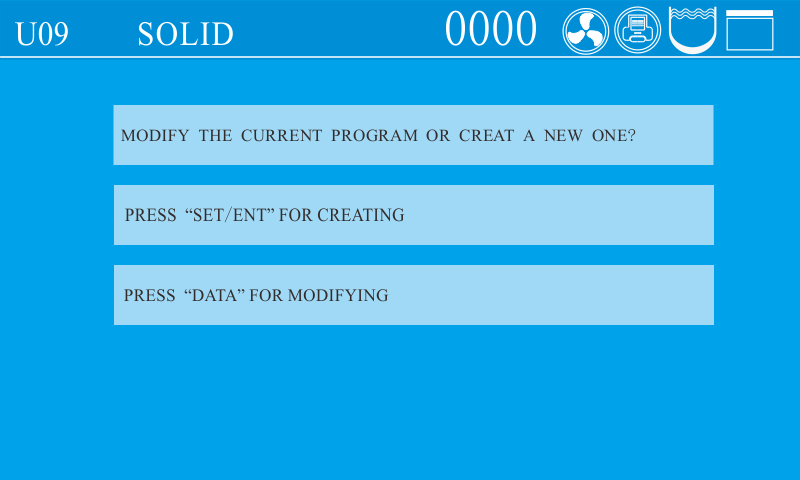
Figure 7
After the above setting, the screen will dump to below screen:
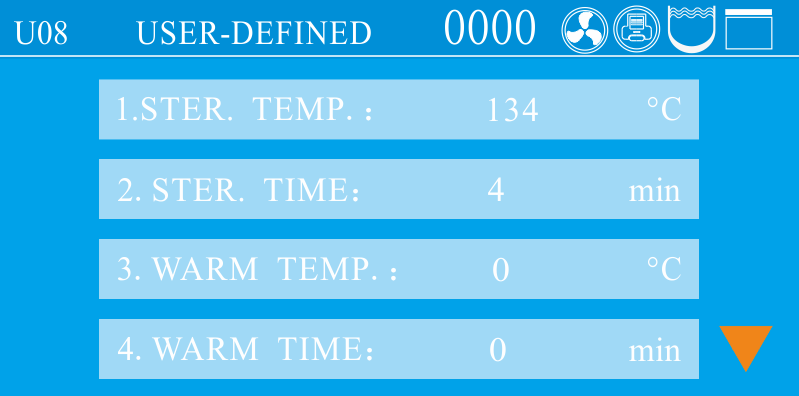
Figure 8
Press SET/ENT button to start modification, when the words are blinking, press UP or DOWN button to change the value, press SET/ENT again to confirm the modification, then press DATA to save and exit.
(3) Program introduction
● For B series there are ten basic modes. For A series ,there are eleven basic working modes available.And these working modes have been saved as nine basic programs (U01, U02, U03, U04, U05, U06, U07, U08, U09), one self-defined program (U10), and one drying program(U11)before delivery.U11 is only for A series.
● The parameters of these ten or eleven basic modes cannot be deleted, but users can select any one as needed to modify parameters and it will become a new program after modified, and a maxium of 60 programs (including the basic programs) can be created and saved;
● We set the default drying temperature and time to be lower and shorter to protect the articles. But when you run the cycles with drying, it is recommended to increase the drying temperature and time depends on different articles compared to the default temperature/time of the fixed program, higher temperature and longer time will help for through drying.
● The DRY and ADD WATER icons are only for the automatic water feeding and drying models(For A series)
● Basic working modes and parameters of corresponding basic programs(Any settings related with drying data are only for drying models: A series, it doesn’t mean that the whole mode is only for drying models, it just means the particular drying data in that mode is only for drying models):
U01-Liquid mode
○ Sterilization process: Standby→Water supply→Heating→Sterilization→Steam exhausting→Complete
○ Application: Sterilization of liquids
○ Click the “DATA” key to show parameters on the LCD display:
○ Default parameters of U01 and new program parameter ranges generated therefrom
| Name | Default Parameter | New Program Parameter Range |
| Sterilization temperature | 121 ℃ | 105 ℃ ~ 138 ℃ |
| Sterilization time | 20 min | 1 min ~ 6,000 min |
| Steam exhaust level | 0 | 0-5 |
| Cooling fan | Open | Open/Close |
| Extended time for purging cold air | 0 min | 0 min ~ 10 min |
| Cover opening temperature | 80 ℃ | 40 ℃ ~ 80 ℃ |
Table 2
U02-Liquid with warming mode
○ Sterilization process: Standby→Water supply→Heating→Sterilization→Steam exhausting→Warming→Complete
○ Application: Sterilization of liquids. In order to prevent solidification, automatic warming is enabled after sterilization (e.g. for agar medium sterilization)
○ Default parameters of U02 and new program parameter ranges generated therefrom
| Name | Default Parameter | New Program Parameter Range |
| Sterilization temperature | 121 ℃ | 105 ℃ ~ 138 ℃ |
| Sterilization time | 20 min | 1 min ~ 6,000 min |
| Warming temperature | 50℃ | 45 ℃ ~ 79 ℃ |
| Warming time | 600 min | 1 min ~ 9999 min |
| Steam exhaust level | 0 | 0-5 |
| Cooling fan | Open | Open/Close |
| Extended time for purging cold air | 0 min | 0 min ~ 10 min |
| Cover opening temperature | 80 ℃ | 40 ℃ ~ 80 ℃ |
Table 3
Note: During the warming stage, the cover can be opened at any time to take out the sterilized load. To continue warming, please close the chamber cover.
U03-Solid mode
○ Sterilization process: Standby→Water supply→Heating→Sterilization→Steam exhausting (water drainage)→Drying→Complete
○ Application: Sterilization of solids
○ Default parameters of U03 and new program parameter ranges generated therefrom
| Name | Default Parameter | New Program Parameter Range |
| Sterilization temperature | 121 ℃ | 105 ℃ ~ 138 ℃ |
| Sterilization time | 20 min | 1 min ~ 6,000 min |
| Drying system | 124℃ | 80 ℃ ~ 160 ℃ |
| Drying time | 40 min | 0 min ~ 300 min |
| Steam exhaust level | 3 | 0-5 |
| Cooling fan | Open | Open/Close |
| Extended time for purging cold air | 0 min | 0 min ~ 10 min |
| Cover opening temperature | 97℃ | 40 ℃ ~ 99 ℃ |
Table 4
U04-Wrapped instruments mode
○ Sterilization process: Standby→Water supply→Heating→Sterilization→Steam exhausting (water drainage)→Drying→Complete
○ Application: Sterilization of surgical instrument packs, paper bags, and paper-plastic packaged instruments
○ Default parameters of U04 and new program parameter ranges generated therefrom
| Name | Default Parameter | New Program Parameter Range |
| Sterilization temperature | 121 ℃ | 105 ℃ ~ 138 ℃ |
| Sterilization time | 30 min | 1 min ~ 6,000 min |
| Drying system | 124℃ | 80 ℃ ~ 160 ℃ |
| Drying time | 40 min | 0 min ~ 300 min |
| Steam exhaust level | 3 | 0-5 |
| Cooling fan | Open | Open/Close |
| Extended time for purging cold air | 0 min | 0 min ~ 10 min |
| Cover opening temperature | 97℃ | 40 ℃ ~ 99 ℃ |
Table 5
U05-Fabric mode
○ Sterilization process: Standby→Water supply→Heating→Sterilization→Steam exhausting (water drainage)→Drying→Complete
○ Application: Sterilization of textiles and dressing packs
○ Default parameters of U05 and new program parameter ranges generated therefrom
| Name | Default Parameter | New Program Parameter Range |
| Sterilization temperature | 121 ℃ | 105 ℃ ~ 138 ℃ |
| Sterilization time | 30 min | 1 min ~ 6,000 min |
| Drying system | 124℃ | 80 ℃ ~ 160 ℃ |
| Drying time | 80 min | 0 min ~ 300 min |
| Steam exhaust level | 3 | 0-5 |
| Cooling fan | Open | Open/Close |
| Extended time for purging cold air | 0 min | 0 min ~ 10 min |
| Cover opening temperature | 97℃ | 40 ℃ ~ 99 ℃ |
Table 6
U06-Rubber mode
○ Sterilization process:
1. Standby→Water supply→Heating→Sterilization→Steam exhausting (water drainage) →Drying→Complete
○ Application: Sterilization of heat and moisture-resistant tubular rubber, porous rubber, and similar items
○ Default parameters of U06 and new program parameter ranges generated therefrom
| Name | Default Parameter | New Program Parameter Range |
| Sterilization temperature | 121 ℃ | 105 ℃ ~ 138 ℃ |
| Sterilization time | 30 min | 1 min ~ 6,000 min |
| Drying system | 124℃ | 80 ℃ ~ 160 ℃ |
| Drying time | 40 min | 0 min ~ 300 min |
| Steam exhaust level | 3 | 0-5 |
| Cooling fan | Open | Open/Close |
| Extended time for purging cold air | 0 min | 0 min ~ 10 min |
| Cover opening temperature | 97℃ | 40 ℃ ~ 99 ℃ |
Table 7
U07-Fast mode
○ Sterilization process:
1. Standby→Water supply→Heating→Sterilization→Steam exhausting (water drainage) →Drying→Complete
○ Application: Only suitable for sterilization of exposed items. Use cartridge cases or specialized sterilization containers for loading. After sterilization, the items should be used promptly without further storage. There is no defined expiration date.
○ Default parameters of U07 and new program parameter ranges generated therefrom
| Name | Default Parameter | New Program Parameter Range |
| Sterilization temperature | 134℃ | 105 ℃ ~ 135 ℃ |
| Sterilization time | 12 min | 1 min ~ 6,000 min |
| Drying system | 140℃ | 80 ℃ ~ 160 ℃ |
| Drying time | 20 min | 0 min ~ 300 min |
| Steam exhaust level | 3 | 0-5 |
| Cooling fan | Open | Open/Close |
| Extended time for purging cold air | 0 min | 0 min ~ 10 min |
| Cover opening temperature | 97℃ | 40 ℃ ~ 99 ℃ |
Table 8
U08-Waste mode
○ Sterilization process: Standby→Water supply→Heating→Sterilization→Steam exhausting (water drainage)→Complete
○ Application: Sterilization of waste, which can be solids, liquids, or a mixture of solids and liquids
○ Default parameters of U08 and new program parameter ranges generated therefrom
| Name | Default Parameter | New Program Parameter Range |
| Sterilization temperature | 126℃ | 105 ℃ ~ 138 ℃ |
| Sterilization time | 40 min | 1 min ~ 6,000 min |
| Steam exhaust level | 0 | 0-5 |
| Cooling fan | Open | Open/Close |
| Extended time for purging cold air | 0 min | 0 min ~ 10 min |
| Start time for purging cold air | 0 min | 0 min ~ 250 min |
| Cover opening temperature | 97℃ | 40 ℃ ~ 99 ℃ |
Table 9
U09-Agar mode
○ Sterilization process: Standby→Water supply→Heating→Melting→Steam exhausting→Warming→Complete
○ Application: Agar melting
○ Default parameters of U09 and new program parameter ranges generated therefrom
| Name | Default Parameter | New Program Parameter Range |
| Melting temperature | 100℃ | 60 ℃ ~ 115 ℃ |
| Melting time | 10 min | 1 min ~ 6,000 min |
| Warming temperature | 50℃ | 45 ℃ ~ 79 ℃ |
| Warming time | 600 min | 1 min ~ 9999 min |
| Cover opening temperature | 80 ℃ | 40 ℃ ~ 80 ℃ |
Table 10
Note: During the warming stage, the cover can be opened at any time to take out the sterilized load. To continue warming, please close the chamber cover.
U10- Self-defined mode
○ Sterilization process:
1. Standby→Water supply→Heating→Sterilization→Steam exhausting→Warming (Drying)→Complete
○ Application: Setting sterilization process parameters according to customer-specific requirements
○ Default parameters of U010 and new program parameter ranges generated therefrom
| Name | Default Parameter | New Program Parameter Range | Remark |
| Sterilization temperature | 121 ℃ | 105 ℃ ~ 138 ℃ | |
| Sterilization completion condition | By time | By time/By F0 value | |
| F0 value | 10 | 1-300 | |
| Sterilization time | 20 min | 1 min ~ 6,000 min | |
| Warming temperature | 50℃ | 45 ℃ ~ 79 ℃ | |
| Warming time | 600 min | 0,1 min ~ 9999 min | 0 indicates the warming function is not activated |
| Steam exhaust level | Level 3 | Level 0 to Level 5 | |
| Cooling fan | Open | Open/Close | |
| Drying system | 140℃ | 80 ℃ ~ 160 ℃ | |
| Drying time | 20 min | 0, 0 min ~ 300 min | 0 indicates the drying function is not activated |
| Extended time for purging cold air | 0 min | 0 min ~ 15 min | |
| Cover opening temperature | 97℃ | 40 ℃ ~ 99 ℃ | |
| Start time for purging cold air | 0 min | 0, 1 min ~ 250 min | 0 indicates the function is not activated |
Table 11
Note: 1. If the warming function is available, during the warming stage, the cover can be opened at any time to take out the sterilized load. To continue warming, please close the chamber cover.
2. When “by time” is selected as the sterilization completion condition, only the sterilization time can be set. When “by F0 value” is selected, only the F0 value can be set.
U11- Drying mode
○ Drying process: Drying→Steam exhausting→Complete
| Name | Default Parameter | New Program Parameter Range |
| Drying system | 140℃ | 80 ℃ ~ 160 ℃ |
| Drying time | 20 min | 1 min ~ 300 min |
| Cover opening temperature | 80 ℃ | 40 ℃ ~ 80 ℃ |
Table 12
Note:
• The drying temperature refers to the temperature of the drying heat source rather than the displayed chamber temperature.
• The drying temperature should be adjusted to the recommended suitable temperature to ensure effective sterilization and protect the load being sterilized. If necessary, the temperature can be increased appropriately within the drying data range. The correct drying temperature helps expedite the drying process.
• Only for GI-SR models.
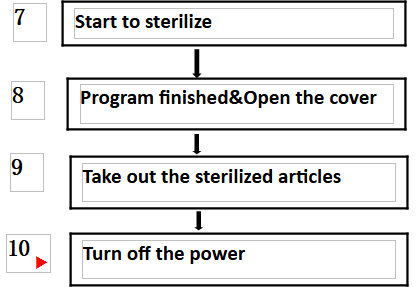
7、Start to sterilize
• 1)After power turned on, screen displays the latest saved program. If you continue to use the program, long press "START" to start the work directly.
• 2)Choose the saved program, use UP or DOWN to choose the program you want, long press START to start work directly.
• 3)Modify or create the new program and start: press the "SET/ENT" to enter the program setting interface, press the "UP" or "DOWN" to select the sterilization mode to be modified, and then press the "SET/ENT" to modify or delete the parameters; If you need to save the changes, press the "SET/ENT" key again, and then press the "START" key to start the work; if you do not save the changes, press the "DATA" key, and then long press the "START".
8、Program finished&Open the cover
Attention: When you open the lid, make sure you rotate the handle to the end before you push to open the lid, otherwise the inside sealing ring might not go enough up, when you close the lid, it might touch the bench to cause dagamge and leak.
1)When reach the set sterilizing time, melting time or lid open temperature(only self-defined mode), the system will send out an alarm.
2)When the program is finished and the temperature is below 3 ℃below the boiling point in solid mode or 20 ℃below boiling point in liquid mode, the "complete" on the screen flashes, and the system will send out 5 long sound, indicating the end of sterilization. At this time, if you open the cover, you should pay attention not to get burnt.
4)when the temperature is lower than 40 ℃, the system returns to the standby state and the cover can be opened safely.
★Note:○If the handle is turned by mistake during sterilization, the handle can not be continue turned due to locked, but there might be a little steam release.In this case, press STOP button to stop the instrument immediately. When open the lid,turn the handle slightly toward the opposite direction that it is wrongly operated, and then turn the handle in counter-clockwise until the cover is released.
○Never press STOP button casually to stop the running program during sterilizing of liquids to avoid the liquid overflowing into the sterilizer chamber and even blocking the valve and pipelines.
○Be careful not get burnt by the hot steam while open the lid
9、Take out the sterilized articles
1)Always wear the heat insulation gloves when taking articles out after sterilization,and wait until the steam disappears before reaching into the sterilizer chamber.
2)When sterilize the liquids,make sure taking articles out with enough low temperature,due to slow cooling sipped of liquid.
3)When installed with load thermometer, be careful it will be stuck while taking baskets out
10、Turn off the power
1)The power switch should be turned off at the end of the day's sterilization work or when it is not in use for a long time.
2)At the end of the day's work, it is recommended to drain out all water in the sterilization chamber.
II.Creating,Modifying,Deleting the Program
1、Creating and modifying the program
Find the required sterilization mode by pressing the "UP" or "DOWN" key, and then press the "SET/ ENT" key to enter the parameter modification interface. If there is a function of setting and enabling password in the background, the administrator password should be input. In the setting process, if you press the "DATA" key, the parameter settings will not be saved and return to the standby state; if you press the "SET/ ENT" key during the setting process, the parameter settings will be saved and a new sterilization mode will be created. Press "START" again to run the program.
Figure 13
2、Deleting Program
●If you need to delete the program, press DELETE PROGRAM
●Default programs can not be deleted.
3、Setting the sterilizing time
●Some items (such as liquid) have high thermal inertia, in order to obtain the ideal sterilization effect, it is recommended to use the load thermometer;if no,set a longer sterilization time.
For example, for 3L water in a flask,when the chamber temperature reaches set temperature after 20 minutes, but the liquid in the bottle hasn’t reach yet, it needs 33 minutes more to reach. So, the sterilization time should set to be 53minute. Actual required sterilizing time(53min)=Normal sterilizing time(20min)+Delay time(33min)
●When installed with load thermometer, the system will begin sterilization process only when the sensor put in the liquids reaches the set temperature.
●When sterilize waste processing bags, 300-500ml water will help to shorten the heating up time.
●A delay time is also needed for plastic products.
4.Setting of Administrator Menu
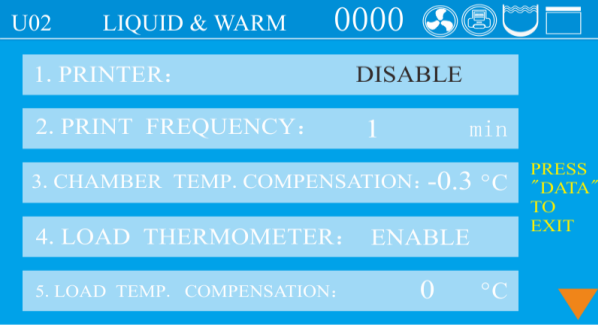
Figure 14
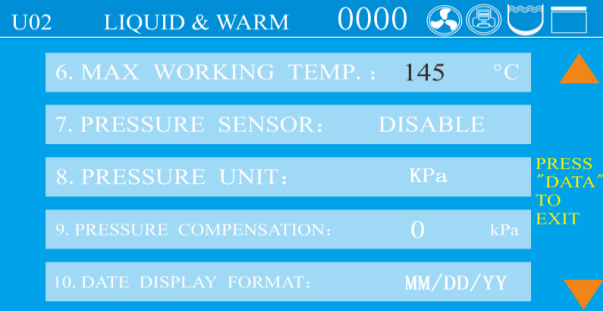
Figure 15
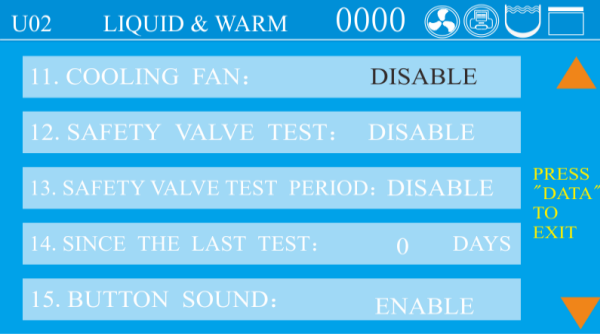
Figure 16
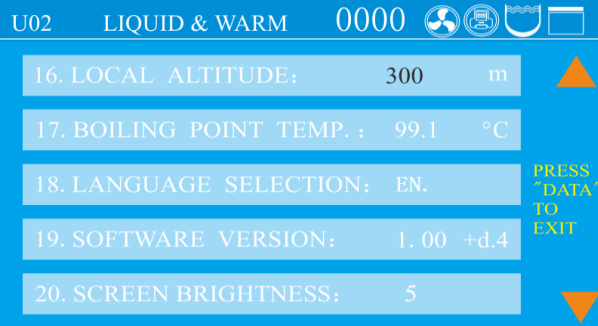
Figure 17
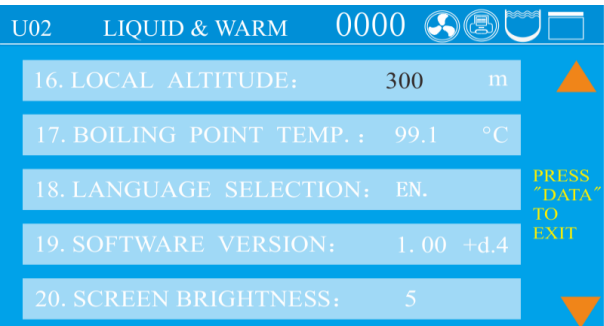
Figure 18
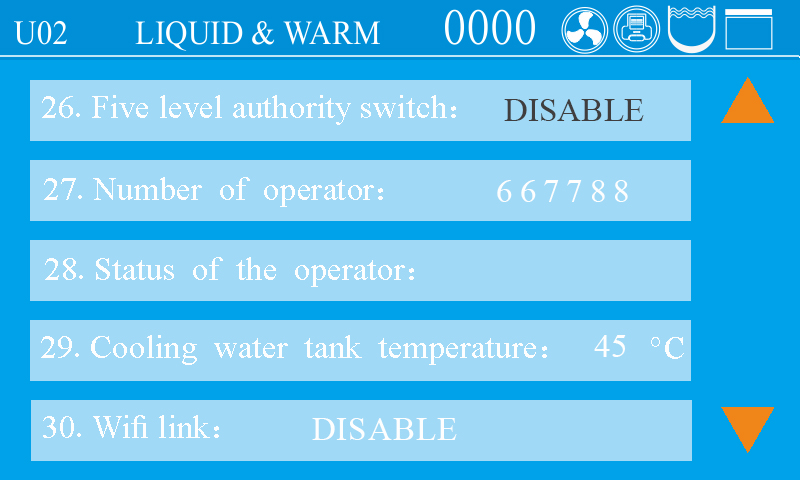
Figure 19

Figure 20

Figure 21
Figure 22
●Under standby condition, press SET/ENT to enter into administer menu, press UP or DWON to choose PARAMETER SETTING,press SET/ENT to enter into,then input password.
●After enter into the menu, press UP or DOWN to choose the item you want to modify, press SET/ENT to enter into and after mofidification, press SET/ENT again to save and exit.
●The default password is 667788, you can modify if you want, if you forget your modification,please contact distributor.
●When doing administrator setting, press STOP will go back to standby screen,press DATA to go back to the previous screen.
●Administrator Menu:
1、PRINTER:You can choose to print only data or “data&curve”
2、PRINTE FREQUENCY:Can choose 1-10 minutes
3、CHAMBER TEMP.COMPENSATION:Range from -5℃to 5℃.
4、LOAD THERMOMETER:Enable and disable,if you choose Enable, screen will show Object temperature value.
5、LOAD TEMP. CMPENSATION:Range from -5℃to 5℃。
6、MAX WORKING TEMP.:Range from 138℃to 145℃,used for safety valve test
7、PRESSURE SENSOR:If pressure sensor is installed and enabled, thescreenwill display the value, if no, screen will show “---"
8、PRESSURE UNIT:You can choose from kpa、psi、bar。
9、PRESSURE COMPENSATION:Range from -5kPa to 5kPa。
10、DATE DISPLAY FORMAT:Year/Month/Date or Date/Month/Year
11、COOLING FAN:Enable and disable
12、SAFETY VALVE TEST:Choose Enable can start the safety valve test
13、SAFETY VALVE TEST PERIOD:You can choose how often to remind you to do test ,30、60、90、120、150、180、210、240、270、300、330、360 day or off.
14、SINCE THE LAST TEST:How many days since the last safety valve test
15、BUTTON SOUND:Enable and disable
16、LOCAL ALTITUDE:Range 0~3000
17、BOILING POINT TEMP.:Local boiling point
18、LANGUAGE SELECTION:Chinese and English
19、SOFTWARE VERSION:Can not be modified
20、SCREEN BRIGHTNESS:Default is 23,adjust range is 10-25
21.TYPE OF PERSSURE DISPLAY:Gauge and absolute
22.FILTER TEMP COMPENSATION:Range -5℃to 5℃
23.RESET FILTER USED TIMES:one cycle will increased once, if machine with filter 24.PRINTING LOAD TEMPERATURE:to print the PT 100 sensor temperature or not
25.PRINTING FILTER TEMPERATURE:to print filter temp. ,if machine with filter
26.FIVE LEVEL AUTHORITY SWITCH: default is on
27.PASSWORD OF ADMINISTRATOR:667788, if you turn on 26: five level authority switch, this one will become Operator 1-8 if you want to create.
28.SATAUS OF THE OPERATOR: default is off
29.COOLING WTER TANK TEMPERATURE: default 45℃,range from 45-65℃
30. WIFI LINK:Turn on can link machine to Wifi
31.MODBUS COMMUNICATION BAUDRATE:Set Modbus baudrate
32.MODBUS COMMUNICATION IP ADDRESS:Range 1-127
33.HIDDEN STERILIZATION MODE:choose the programs you want to hide
34.EMPTY WATER AFTER STERILIZATION:for solid mode, for one-click drainage function.
35.ONE-CLICK DRAINAGE TEMPERATURE: default 45℃,range from 45-80℃
36.TIMES OF SMART CLEANING:how many times you want to repeat smart cleaning,default 0,range 0-10. Only valid when you have automatic water feeding function.
37.TIMED LOW TEMP. WASH: Default is off
38.TIME TO START LOW TEMP. WASH:make appointment for auto start low temp. wash, need to add water and drain the water manually when it finished for SA and need to drain manually for SF/SR if not equipped with one click drainage.
39.DRAINAGE/CLEANING FREQUENCY: default is appear each 7 days, range is 1-30 or off. If you want to turn off the smart cleaning, need to turn off 39 and 41 together.
40.LAST DRAINAGE/CLEANING TIME:can not be modified
41.REMINDER FOR CLEANING TIMES: default is appear after 20 cycles, range is 1-60 or off. If you want to turn off the smart cleaning, need to turn off 39 and 41 together.
42.NUMBER OF TIMES NOT CLEANED: can not be modified
43.TO PRINT S/N:
44.TO PRINT QUALIFIED/UNQUALIFIED:
3.Clock Checking and Calibration
Press SET/ENT to enter into management menu, press UP/DOWN to choose “CHECK AND MODIFY TIME”, press SET/ENT to enter into next menu. After modifying,press SET/ENT to save and exit, press DATA to exit without saving.
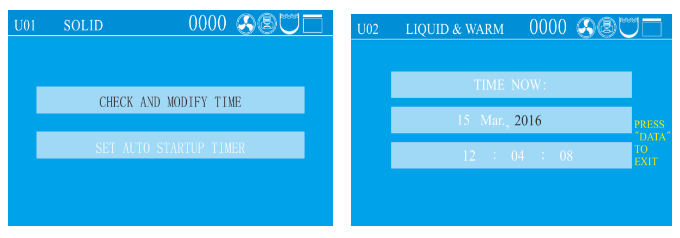
Figure 23
Adjustable Time Range:
| Name | Adjustable Range |
| Year | 2000~2099 |
| Month | 1~12 |
| Date | 1~31 |
| Hour | 0~23 |
| Minute | 0~59 |
| Second | 0~59 |
Table 13
●Please make sure you set reasonable date, if not, the system will switch back to the correct date.For example, If you set Feb.30,2018, system will switch to Mar.1,2018 after 23:59:59, Feb.30,2018.
4.Set auto start timer
Press SET/ENT to enter into management menu, press UP/DOWN to choose “SET AUTO STARTUP TIMER”, press SET/ENT to enter into next menu. After modifying,press SET/ENT to save and exit, press DATA to exit without saving.
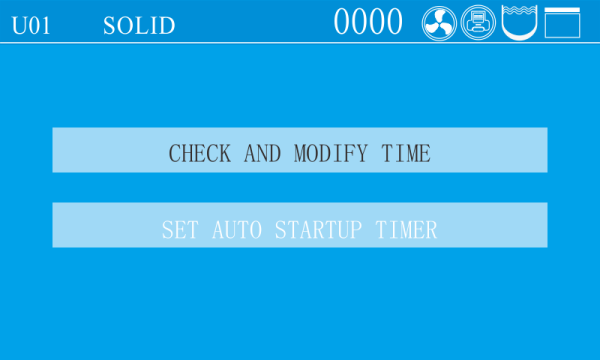
Figure 24
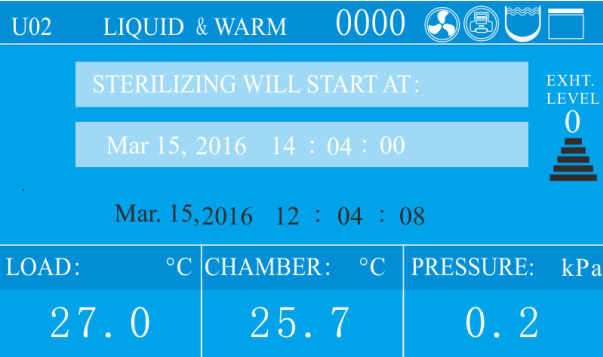
Figure 25
★Note:○Please recheck the time setting, if the time is not set correctly, the auto start timer will follow the wrong setting.
5.Account management
First, after the instrument is powered on and turned on, press the "SET/ENT" key,the display is as follows:
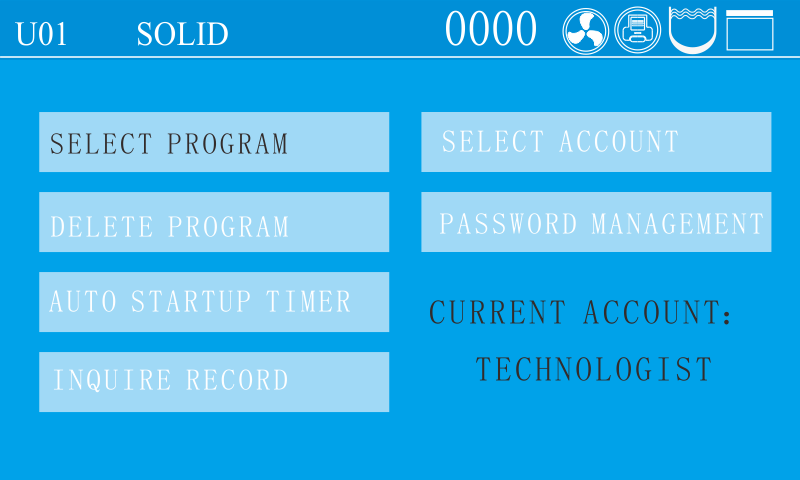
Figure 26
Press UP and DOWN to choose Select Account, then press SET/ENT to enter.
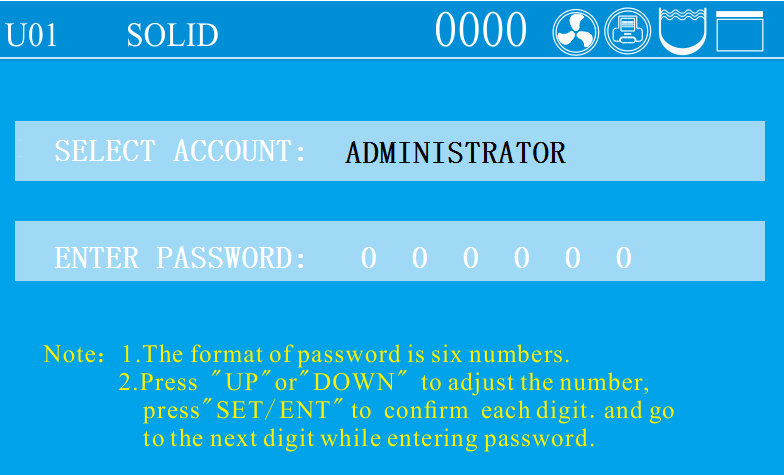
Figure 27
Select the account you want to use, and then enter the correct password to enter the standby interface.
Note: The instrument will remember the last account used. For example, Operator 2 was used last time, and the account first displays Operator 2 after startup
1.Operator
After selecting the operator account and entering the password (the initial password is 000000), press the "SET/ENT" key, and the display is as follows:
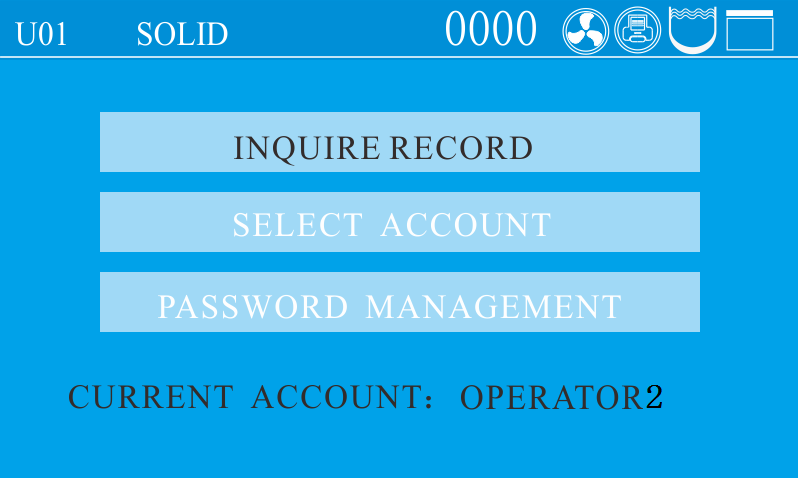
Figure 28
The operator has a total of 3 permissions, as shown in the figure. When the display font is black, it means it is selected, and then press the SET/ENT key to enter the corresponding menu.
1.1.Record Query
Enter the record query interface as follows:
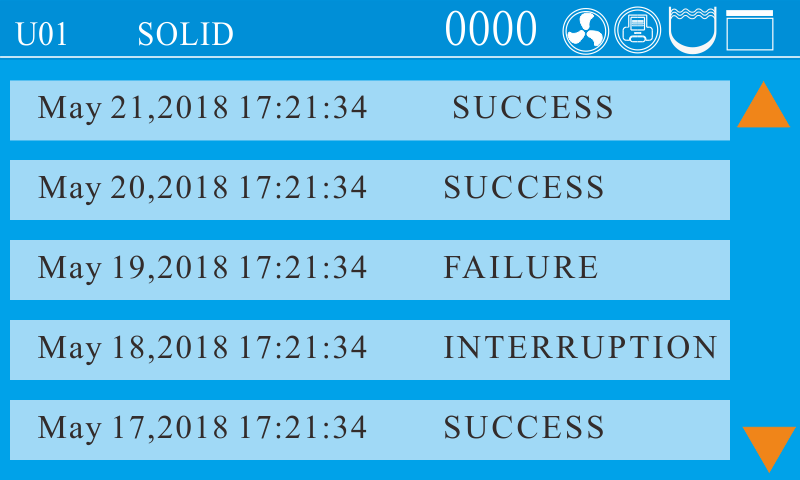
Figure 29
A:The latest record will be displayed automatically
B:Five records are displayed on each page. When there is content on the next page, the lower triangle in the lower right corner indicates that there is an earlier record page below, and the upper triangle in the upper right corner indicates that updated records can be switched
C:Each record is displayed by the time when the sterilization was started and whether the sterilization was successful.
D:You can press the UP or DOWN key to switch up and down to select the record. When the next record is reached, pressing the DOWN key again will switch to the next earlier record interface.
E:After selecting a record and pressing SET/ENT, the screen will display this sterilization information, as follows:
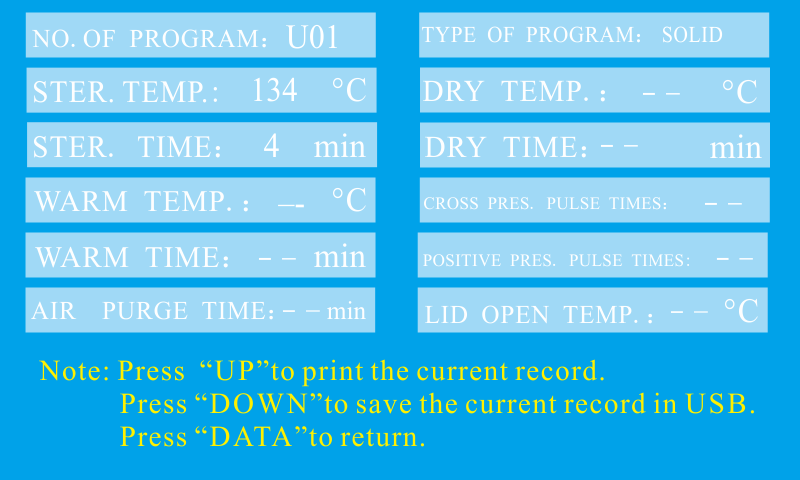
Figure 30
1.2.Account switching
Enter account switching, and the interface displays the following content. The font of the account name flashes, indicating that the status can be switched, press "UP" or "DOWN" to select the user to be switched, and press "SET/ENT" to confirm. The system will automatically switch to the password option. At this time, press the "SET/ENT" key to confirm. The initial password is "000000". After that, the system will prompt "Account switching succeeded!".
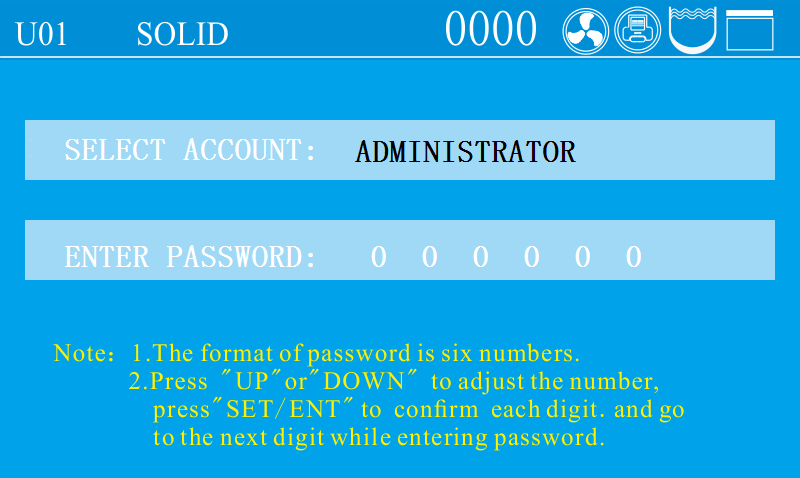
Figure 31
1.3 Password management
After entering the password management, the password confirmation interface will pop up first, as shown below:
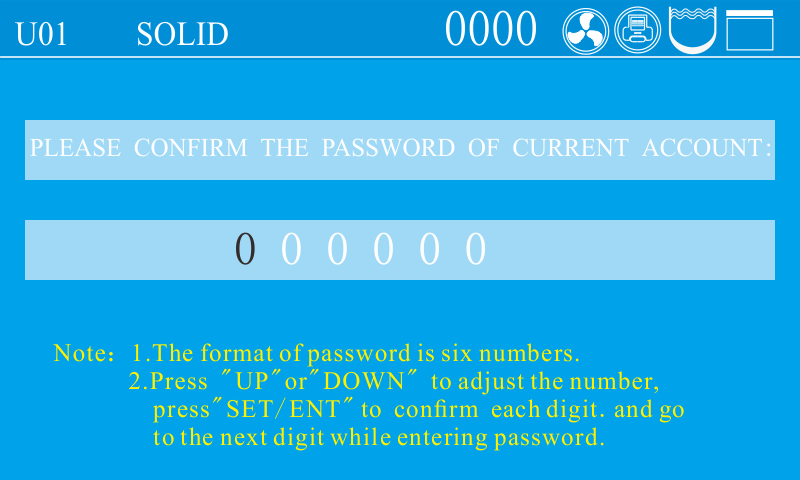
Figure 32
Press the "SET/ENT" key to confirm the password for the first time. The initial password is "000000".After confirmation, the following interface will appear. At this time, press the "UP" or "DOWN" key to change it into a password that you can easily remember,The reset account and password account can be confirmed according to the status displayed on the interface. No change is required.
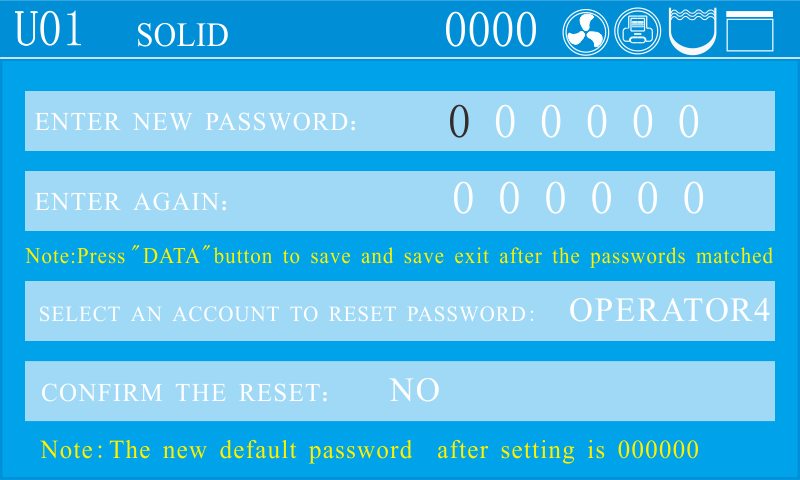
Figure 33
2、Technologist
After selecting the technologist account and entering the password (the initial password is 000000), press the "SET/ENT" key,the display is as follows:
Figure 34
The record query and account switching are the same as those of the operator.
2.1.Program settings, see “Setting of administrator menu”.
2.2. Appointment for auto start: see “Setting auto start timer”
2.3.Password management
The interface is as follows:
Figure 35
The password modification method at the top of the screen is the same as that of the operator. The technologist has a function to reset other account passwords in this interface. The technologist can only reset the password of the operator.
3、Administrator
After selecting the administrator account and entering the password, the initial password is 000000. Press the "SET/ENT" key, and the display is as follows:

Figure 36
The parameter setting and password management permissions are the same as those of the technologist. For parameter settings, please refer to the description in “Setting of administrator menu”.
5. Maintenance
★Note:Turn off the power, make sure the chamber is cooled down before maintain or fix.I.Cleaning
1、Water change and chamber cleaning
1)Water change
●If the water in the chamber is not changed for a longtime,the dirt inside will cause damage to solenoid valve.
●Connect the drainage to the chamber drain port, then open it counterclockwise.
2)Chamber cleaning
●Clean the chamber once a week
★Note:○Make sure the water inside is not hot before draining out
○Drain the water completely when the machine is not used for a long time
2、Heater cleaning
●Take out the water plate and check whether the surface
Of heater is clean or not.Otherwise,wash with soft brush,
And then empty the dirty water
●Do not move or damage the temperature control switch on the heater
●Suggest to clean once a month
3、Clean the instrument surface
●The surface of instrument may be cleaned slightly by using the soft cloth with little neutral detergent solution, and then dried with cloth
●Do not use phenol or oil thinner to clean the surface of the instrument to avoid damaging the surface of the instrument or causing the paint to fall off
II.Maintenance
1、Check of Leakage Circuit Breaker
●Press the T button at the back of leakage circuit breaker,if it dumps off,means-normal,if no, please turn off and contact the dealer
●Press the power switch,pull up the leakage circuit breaker,can connect the power again
●Check once half year
2、Safety valve test
●Enter into the administer menu(Refer to Setting of Administer Menu), then press DOWN to choose the safety valve test,chooseENABLE,press SET/ENT to save and exit.
●The instrument will start to do safety valve test, you can press STOP to stop it.
●If the temperature goes over the max temperature and safety valve is not releasing, means there is problem with the safety valve, please stop the test and contact distributor.
●Press STOP can put an end to the testing,screen will show E03,this is normal, you can press STOP button after the temperature goes down to 105℃ to return to standby condition.
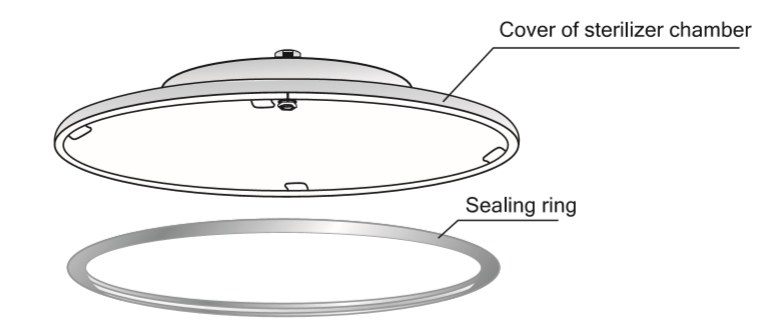
3、Cleaning&Replacement of Sealing ring
1)Wipe the surface of the sealing ring and it is contact parts with soft and clean cloth at least once a week to avoid steam leakage resulted from damage by dirt
2) If the edge of the sealing ring of cover becomes white or hardened, it may lead to steam leakage, and must be changed.
3)Sealing ring change way:Pull one corner of the sealing ring to take off, when installing, press the sealing ring in part by part.
6. Troubleshooting
●The automatic control system of the sterilizer monitors the real time operation of the instrument. Whenever any failure occurs,the system may send out alarm and display the error code, then please press STOP button to return standby status, and turn off the power, check the error code and handle on time.●To make sure safety, only open the lid when there is no pressure inside and temperature is lower than boiling point. For liquid model,do not press STOP before temperature is lower than the boiling point,so as to avoid liquid overflowing.
| Error Code | Possible Causes | Suggested Solution |
| E-01 | Lid not secured | Check the handle is secured well or not, make sure it is placed either vertically or horizontally |
| E-02 | Local altitude not set | Set the local altitude |
| Dirt in exhaust solenoid valve | Open the valve filter to check | |
| E-03 | Lack of water lead to heater dry heat | Add enough water in |
| Safety valve or pressure switch is not working | Change safety valve or pressure switch | |
| Over temperature lead to over pressure | Check main board or temperature sensor | |
| E-04 | Abnormal temperature fluctuation caused by abnormal power supply fluctuation | Check pressure of power supply is between198V-242V |
| E-06 5151 | Chamber temperature sensor drop off from mainboard | Plug the temperature sensor well |
| Chamber temperature sensor problem | Change temperature sensor | |
| E-07 | Short circuit in plug or wiring of chamber temperature sensor | Change the temperature sensor |
| E-10 | Sudden power off during sterilization | Press STOP shortly, then restart again |
| E-16 | Load thermometer drop off or short circuit | Plug the load thermometer well |
| Load thermometer failure | Change load thermometer | |
| E-18 | Over pressure in chamber | Stop work and contact distributor |
| E-20 | Safety valve test circuit faulty | Contact local dealer |
| E-24 | Block of safety valve pipe | Clean safety valve pipe |
| Safety valve failure | Change safety valve | |
| E-26 | Pressure sensor drop off from mainboard | Plug the pressure sensor well |
| Pressure sensor failure | Change the pressure sensor | |
| E-27 | Short circuit in plug or wiring of chamberpressure sensor | Contact local dealer or change pressure sensor |
| E-37 | Low water level in the sterilization chamber | Add water to the chamber |
| Water level sensor contaminated | Clean the water level sensor | |
| Water level sensor failure | Contact the local DEALER OR MANUFACTURER Service | |
| 5351 | Press the white T button didn’t pressed in | Press the white T button |
| E-leakage or short circuit or overcurrent | Contact local dealer |
Table 14
In liquid mode,press STOP, the exhaust valve will not open until the temperature oes down to the set exhaust temperature, so as to avoid liquid overflowing.
Below are note messages. You can press the STOP key very shortly to return to the standby state.
| Note Message | Suggestion |
| Over temperature in the chamber! | Wait for the temperature to decrease before proceeding with work |
| Clean the chamber, drain the water then remove this note while no water in the chamber! | Please clean the water level sensor, heating tube, and sterilization chamber, and then drain the water from the chamber to clear this message. |
| Unreasonable setting of auto start time! | Reset the time |
| The safety valve test hasn't been done for too long! | Test the safety valve |
| Water shortage in water tank | Manually add water or enable automatic water filling |
| Please wait for the micro pressure to release. | There is still pressure in the chamber. Please wait for it to be released |
Table 15
● The above table lists some simple errors, causes, and suggestions for repair. If you are unable to deal with these problems, please contact dealer or manufacturer and provide the following information:
1) Instrument model and S/N
2) Damaged part and fault phenomenon and sterilized load (error code, if any)
3) Operation details before the error appears
4) Date of purchase of the instrument
5) Software version