Thermo Shaker Incubator BSTH-102
- Sea, Air, Door to Door Shipping
- 1 Year Warranty
- US & European Standards
- Optimized 2D mixing designed for simultaneous mixing and vortexing applications
- Pre-programmed soft keys and reliable universal holder
- Automatic imbalance detection and anti-spill technology
- Mixing in a 3-in-1 format: Plates (up to 96-well and 384-well formats), Micro-Tubes, vortexing numerous tube formats
Specification
Features
Applications Optional Accessories
| Speed Range | 300-2000 rpm |
| Temp. Control Range | R.T.+5°C~100°C |
| Temp. Setting Range | 5°C ~100°C |
| Temp. Stability | ±0.3°C |
| Shaking Orbit | 3 mm (horizontal) |
| Block Temp. Uniformity | ±0.3°C |
| Temp. Display Accuracy | 0.1°C |
| Heating Speed | ≤15min (20°C to 100°C) |
| Timing Range | 1 min~99 h 59 min |
| Voltage | AC 220 V / AC 110 V, 50/60 Hz |
| Power | 200 W |
| Fuse | 250 V, 2A/3A, φ5x20 |
| Dimension | W.196 x D.270x H.170mm |
| Net Weight | 8.2 kgs |
- Optimized 2D mixing designed for simultaneous mixing and vortexing applications
- Pre-programmed soft keys and reliable universal holder
- Automatic imbalance detection and anti-spill technology
- Mixing in a 3-in-1 format: Plates (up to 96-well and 384-well formats), Micro-Tubes, vortexing numerous tube formats
- Custom blocks available for different experiment needs
Incubation, Cultivation, Re-suspending Pellets, Denaturin, PCR preparations, ELISA Assays, Colorimetric Assays, Enzyme, Protein Analysis
| Accessory Code | Name | Description | Max Temperature |
| 2001906006 | Block A | 96x0.2 ml PCR plate | 100°C |
| 2001906007 | Block B | 54x0.5 ml | 100°C |
| 2001906008 | Block C | 35x1.5 ml | 100°C |
| 2001906009 | Block D | 35x2.0 ml | 100°C |
| 2001906010 | Block E | 20x0.5 ml+15x1.5 ml | 100°C |
| 2001906011 | Block F | 24xdia.≤Φ12 mm | 100°C |
| 2001906012 | Block G | 32x0.2 ml+25x1.5 ml | 100°C |
| 2001906013 | Block H | 32x0.2 ml+10x0.5 ml+15x1.5 ml | 100°C |
| 2001906014 | Block I | 103x67x30 mm (water bath block) | 100°C |
| 2001906015 | Block J | flat block | 100°C |
| 2001906016 | Block K | 24x5 ml (non-standard max. speed 600 rpm) | 100°C |
| 2001906017 | Block L | 12x15 ml (non-standard max. speed 600 rpm) | 100°C |
| 2001906018 | Block M | 6x50 ml (non-standard max. speed 600 rpm) | 100°C |
| 2001906019 | Block N | Customized | 100°C |
| 2001906020 | Cover A | Suit for block A ~I J | |
| 2001906021 | Cover B | Suit for block J K L M | |
| 2001906022 | Tube Stand A | 96x0.2 ml tube stand | |
| 2001906023 | Tube Stand B | 24x0.5 ml tube stand | |
| 2001906024 | Tube Stand C | 24x1.5/2.0 ml tube stand |
Operating Manual for BSTH-102
1. Introduction
2. Specifications
2.1 The Normal Operation Condition
2.2 The Basic Parameters and Specifications
3. Preparation
3.1 Structure Description
3.2 Keyboard and Display Panel
3.3 Key Function
4. Operation Guide
4.1 Setting Single Temperature, Speed and Timing
4.2 How to Shut off the Temperature, Speed and Timing Function
4.3 Short Mix
4.4 Temperature Calibration
4.5 Block Replacement
4.6 Tube Stand Fixing
4.7 Plate fixing
5. Failure Analysis and Trouble Shooting
1. Introduction
The thermo shaker incubator is best designed with fast mixing speed and integrates 3 functions of mixing, shaking and incubating. Combined with intelligent operation, it can mix not only various tubes, PCR plates, deep-well plates, micro plates and other laboratory supplies, but also equipped the function of vortexing and heating all kinds of tubes to meet different needs of different users.Features:
1. Perfect radius and excellent dimensional technology blend with adjustable mixing speed.
2. Programmable. Efficient shaking and temperature control.
3. Microprocessor controlled incubator. Good linearity of temperature control. Accurate controlling of the shaking speed.
4. Timing function. Time range is from 0 to 100hours.
5. Various blocks to exchange, convenient for replacement.
6. Built-in temperature calibration function and short mixing function.
7. DC brushless motor drive, long life and free of maintenance.
8. Multiple safety protection function. Conform to CE safety standards, safe and reliable.
2. Specifications
2.1 The Normal Operation Condition
Ambient Temperature: 5°C ~ 30°CRelative Humidity: ≤70%
Power: 220V / 110V 50-60Hz
2.2 The Basic Parameters and Specifications
| Type Parameter | BSTH-102 |
| Mixing Rate | 300 ~ 2000rpm; 300 ~ 1600rpm |
| Orbit | 3mm |
| Temperature Setting Range | 5~100°C |
| Temperature Controlling Range | R.T.+ 5°C ~ 100°C |
| Timing Range | 1min ~ 99h59min |
| Temperature Accuracy | ≤ ± 0.5°C |
| Display Accuracy | 0.1°C |
| Heating Time | ≤20min (20°C to 100°C ) |
| Heating Part | HEATER |
| Power | 220V / 110V 200W |
| Fuse | 250V 3A Ф5×20 |
| Dimension (D x W x H) | 270×196×170 mm |
| Net Weight | 8.2kg |
Table 1
3. Preparation
This chapter mainly describes the instrument’s mechanical structure, the keyboard and functions of each key, as well as preparations before power on. Please learn this chapter well before the Thermo Shaker to be operated the first time.3.1 Structure Description
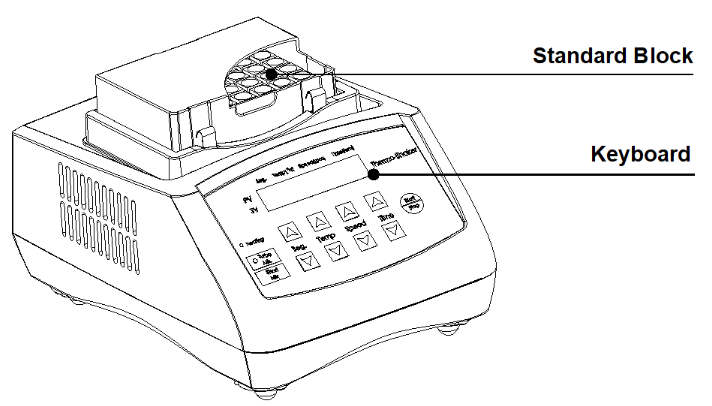
Figure 1
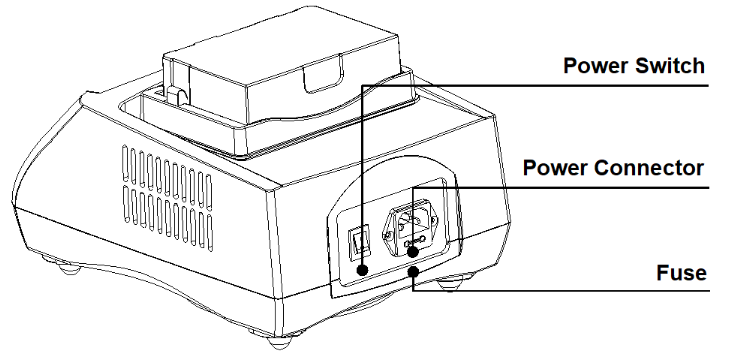
Figure 2
3.2 Keyboard and Display Panel
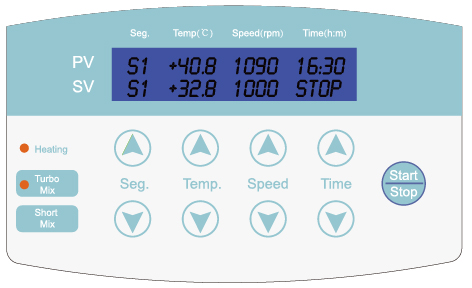
Figure 3
Keyboard
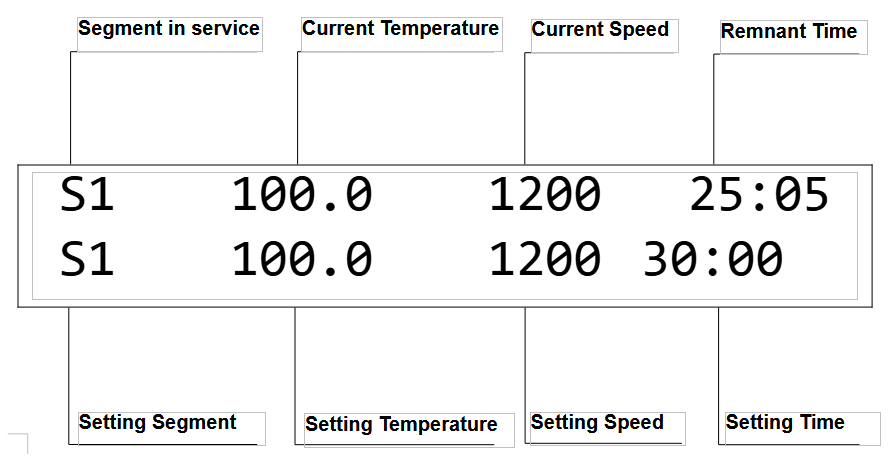
Figure 4
Display Pannel
3.3 Key Function
Seg.
 : Key for selecting procedure segment. Five segments S1, S2, S3, S4, S5 can be selected.
Temp.
: Key for setting temperature. Press “ ” or “ ” to set the target temperature. Press “ ” or “ ” continuously can quickly set temperature conveniently with x10 speed. Continuously press “ ” till it displays “OFF” on the LCD, shut the thermo function.Speed
: Key for setting speed. Press “ ” or “ ” to set the target speed. Press “ ” or “ ” continuously can quickly set speed conveniently with x10 speed. Continuously press “ ” till it displays “OFF” on the LCD, shut the shaking function. Speed setting unit is 1rpm.Time
: Key for setting timing. Press” ” or “ ” to set target timing hours. Press “ ” or “ ” continuously can quickly set timing conveniently with x10 speed. Continuously press “ ” till it displays “OFF” on the LCD, shut the timing function.Short Mix: Key for short mix. The device mixes at the frequency visible in the display for as long as the “Short Mix” key is held down. The time is counted in seconds until 999s has expired.
Start/Stop: Key for start or stop. Press Start/Stop key to start or stop the program. Momentary pressing is to start the program while continuously pressing is to stop the program.
Turbo Mix: Key for Turbo Mix. The indicator light on side is on and off while the highest setting speed changing between 2000rpm and 1600rpm when press key of Turbo Mix. When the highest setting speed can set at 2000rpm, the light is burning. When the highest speed can be set at 1600rpm, the light is off.
Heating: Indicator light. The indicator light is flickered when heating or cooling. The indicator light is normally on when it is thermostatic.
4. Operation Guide
4.1 Setting Single Temperature, Speed and Timing
a) The instrument enters into the initial program as the chart on the right with a beep when power on.b) After 6 seconds, the LCD display program, e.g. as the right chart. “S1” is the segment run in last operation. “30.0” indicates current temperature of the block. “37.0” is setting temperature, “1000” is setting speed, “10:00” is setting time in last operation. Temperature unit is °C, speed unit is rpm, and time unit is hour:minute.
c) Press
or of Temp, the temperature setting value will increase or decrease from decimal digit, unit digit, tens digit to hundreds digit.Press
or of Speed or Time to set shaking speed or time.Continuously press
or to increase or decrease the value from unit to tens digit, to hundreds digit quickly.Instrument confirms and autosave the setting value.
After finishing setting program S1, press “Start/Stop” to run S1.
When program finished, it will alarm a beep five times. Shaking will be stopped while temperature kept at the setting value.
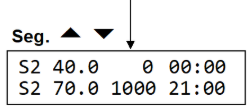
d) Press
or of Seg. to select Segment. Set the segment’s values according to c). Total five segments can be set for operation.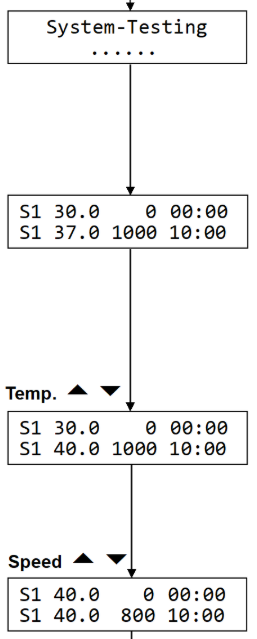

4.2 How to Shut off the Temperature, Speed and Timing Function
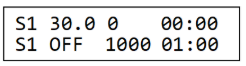
a) Press “ ” or “ ” of Seg. to select one segment of the S1, S2, S3, S4, S5.b) Press “
” of Temp. till it displays “OFF” on the LCD, shut the thermo function. Similarly, press “ ” of Speed or Time till it displays “OFF” on the LCD, shut the shaking or timing function.Notice: 1) Shut off the timing function, LCD display “∞”, the program continue forever.
2) When the device is in operating, “CON” is displayed.
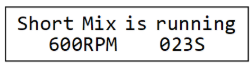
4.3 Short Mix
Press “Short Mix”, the instrument starts to shake. Release “Short Mix”, shaking stops.When short mix, LCD displays as the right chart. “600RPM” is the shaking speed. “023S” is operated time. The time is counted in second until 999 seconds has expired.
NOTICE:
The maximum short mix speed can be set according to requirement at the current segment.
4.4 Temperature Calibration
The temperature of the instrument has been adjusted before it is sold out. If there is deviation between the actual temperature and the displayed temperature, you can do as follows to calibrate it.NOTICE:
1) The instrument has 2 calibration temperature points to ensure the veracity. It is
linearly adjusted on 40C and 100C. The temperature accuracy will be within ±0.5C after temperature calibration.
2) Both the environmental and the block temperature should be lower than
35C when calibration.
Adjustment Methods:
a) Power on the instrument, it enters into waiting interface. Make sure the current temperature in display is below 35C. If the temperature is higher than 35C, please wait until it down below 35C.
b) Inject olefin oil into one of block well, and then put a thermometer into this well (the precision of the thermometer should be 0.1C and the temperature ball should be absolutely immerged into the olefin oil in the block well). Adiabatic material is needed on the block to separate it from the circumstance. (refer to below Figure 5)
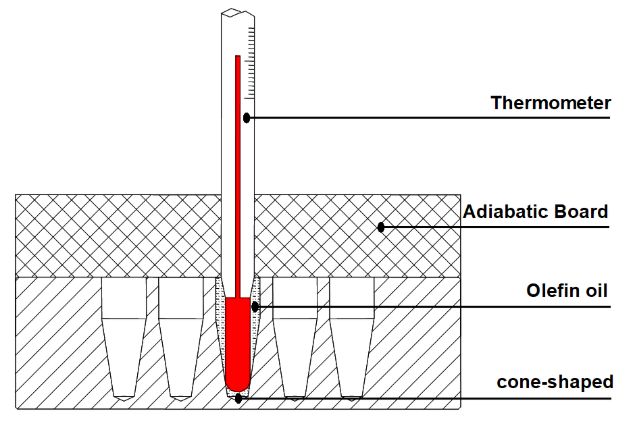
Figure 5
NOTICE: To ensure the calibration precision, read the actual temperature value after the temperature reaches calibration points for at least 20 minutes.
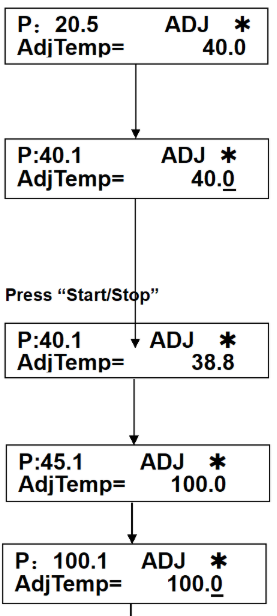
c) Press
and of Seg. simultaneously when the instrument is not operating. The program turns to the interface as the right chart. Practical temperature is behind “P:” which shows 20.5, and the program auto controls the temperature to 40C. At the same time, the sign“ ” flickers ceaselessly. The value behind “AdjTemP” is the calibration temp. When temperature achieves 40C, “ADJ” and “ * ” flicker ceaselessly together, the value behind “P:” is still the practical temperature.d) Wait for 20 minutes, the actual temperature of thermometer is 38.8C. Press
or of Temp. to amend the value behind “AdjTemP” to 38.8.Press “Start/Stop” to confirm.
The program saves the value.
The temperature rises to 100C automatically.
The sign “” flickers ceaselessly.
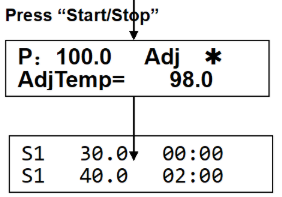
e) When practical temperature reaches 100C, “ADJ” and “*” flicker ceaselessly together.
f) Wait for 20 minutes, the actual temperature of the thermometer is 98°C. Press
or ofTemp. to amend the value behind “AdjTemP” to 98.0.
Press “Start/Stop” to confirm
g) Program turns to interface for operation as the right chart.
After temperature calibration, the temperature display is the same as the practical temperature of the block.
NOTICE:
1) During temperature calibration, press
and of Seg. simultaneously to cancel the celebration. The system keeps the former calibration.2) Do not simultaneously press
and of Seg. unless calibrate is really needed.4.5 Block Replacement
a) Open the cover. Pull out the three screws which fix the block to the heating board with the screwdriver.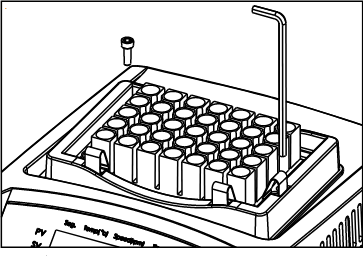
Figure 6
b) Take out the screws, close the lid, put out the block from the main engine.
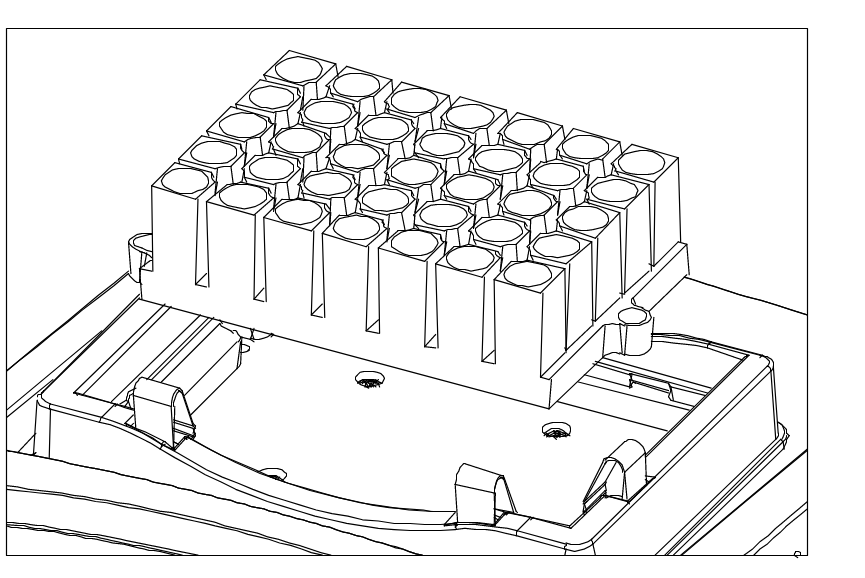
Figure 7
c) Take another model block, steadily lay aside on the main engine. The block installment holes aim consistently at the main engine installment holes.
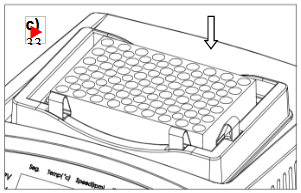
Figure 8
d) Put the screws into the installment hole, fix the metal block on the instrument with the spanner
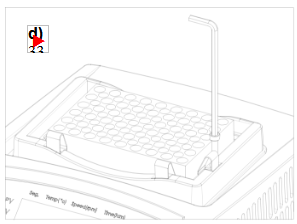
Figure 9
4.6 Tube Stand Fixing
a) Remove the block according to “Block Replacement” as above item 6 first. Push the two bulges at rear of the stand to corresponding hollows of base frame.Refer to the right chart a).
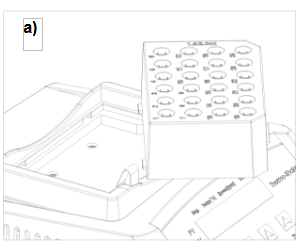
Figure 10
b) Push and press the front part of the stand till the “PUSH” trip locks in the base frame.
Refer to the right chart b).
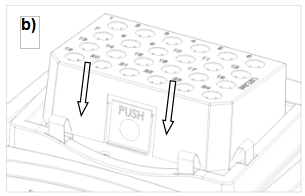
Figure 11
4.7 Plate fixing
Press one of the long side into the base frame. Press another side as the arrowhead in the right chart c) indicates till the spring locks the plate. Make sure the plate is fastened.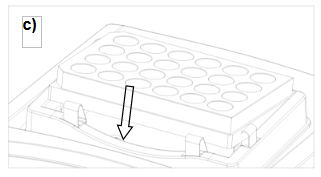
Figure 12
5. Failure Analysis and Trouble Shooting
Failure Analysis and Processing Procedures| No. | Phenomenon | Possible Causes | Processing Procedure |
| 1 | No signals on the display when power on. | No power | Check the power |
| Broken fuse | Exchange fuse (250V 3A Ф5x20) | ||
| Broken switch | Exchange the switch | ||
| Others | Contact with the seller | ||
| 2 | The actual and displayed temperatures are much different. | Broken sensor | Contact with the seller |
| 3 | “OPEN” in the temperature display with alarm of beep. | Temperature sensor is divided or ambient temperature below 0C | Contact with the seller |
| 4 | “SHORT” in the temperature display with alarm of beep. | Temperature sensor is short or ambient temperature below 0C | Contact with the seller |
| 5 | No heating | Broken sensor | Contact with the seller |
| 6 | Press invalid | Broken press button | Contact with the seller |
Table 2
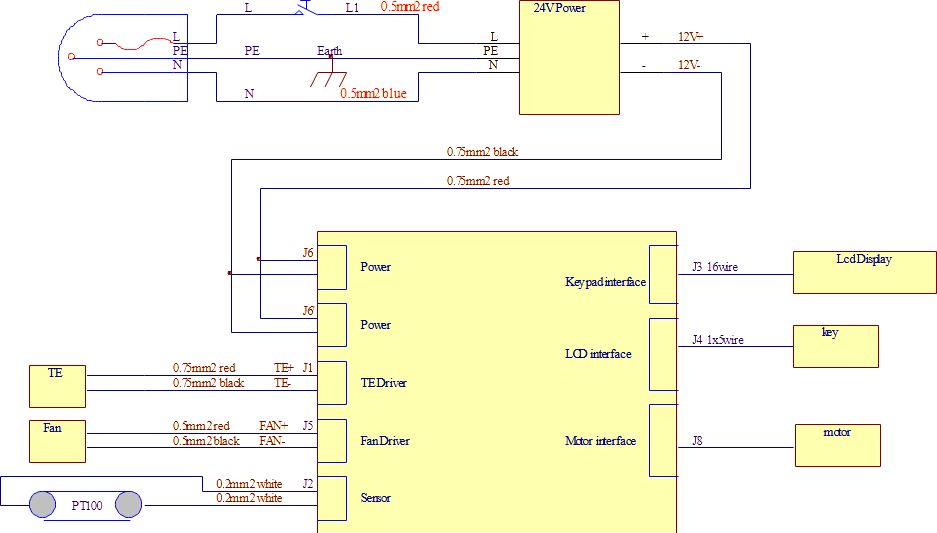
Appendix A:Wiring Diagram of MTH-100
(Below diagram is just for reference. It is subject to change without prior notice.)