


Paraffin Trimmer BPTR-101
- Sea, Air, Door to Door Shipping
- 1 Year Warranty
- US & European Standards
Paraffin Trimmer is used to remove excess wax from the outside of a tissue cassette and to clear the edge of the cassette of excess wax after paraffin embedding. This device features a ridged heating surface where the temperature can be adjusted in a range from ambient to 90°C.
- Full computer automated control.
- Utilizes new type of heating elements that enable fast heating, energy, efficiency and reliability.
- Temperature sensors are made in USA, precise and reliable.
- Automatically saves the latest operational settings.
Specification
Features
Applications
| Working Area | 230×160 mm |
| Temperature Range | Continuously adjustable within 0 - 90°C |
| Temperature Control Precision | ±1°C |
| Electrical Requirement | 220V±10%50 Hz or 110V±10% 50/60 Hz |
| Power | 150 W |
| Dimension | 255W×180D×155H mm |
| Weight | 3 kg |
- Full computer automated control.
- Utilizes new type of heating elements that enable fast heating, energy, efficiency and reliability.
- Temperature sensors are made in USA, precise and reliable.
- Automatically saves the latest operational settings.
- Memory and automatic restoration function, the preset temperature can be automatically saved after device operation.
- LED displays the heating status.
Medical, Research, Tissue, Biopsy, Mega and Embedding
Operating Manual for BPTR-101
1. General Description
2. Technical Parameters
3. Display interface
4. Setting Control Panel
5. Operation
6. Appendix
1. General Description
Paraffin trimmer BPTR-101 ‘s control part of is composed of STC89C51 chip,imported high precision temperature sensor and its external parts, fulfilling the function of input & output the data . The advanced inner PID control the heating evenly with accuracy.2. Technical Parameters
● Size of Table: 1500×220mm● Range of temperature: ambient~90℃
● Precision: ±1%
● Voltage: 220V±10% 60HZ
● Power: 150W
● Current: 0.5A
● Fuse: F1A/AC250V
● Overall dimension: 220(L)×160(W)×175(H)mm
● Net Weight: 3kg.
3. Display interface
The display interface is composed of three nixie tube ,one LED luminous diode. The nixie tube shows the present temperature and set temperature .The LED shows the heating state ,which is simple & clear .
.Figure 1
1). When press SET key, the three nixie tubes show set temperature , and the temperature can be adjusted by pressing “↓” or “↑” key to the required values. When the system starts or stops heating control , it shows the current temperature .
2). When press SET Key, the LED indicator turns green, and the heating temperature can be set at this time. When the system starts heating control , the LED indicator twinkles with red and the twinkle frequency changes with the system temperature. When the system temperature reaches the set temperature, the LED indicator turns orange. When the system stops heating control, the LED indicator goes off.
4. Setting Control Panel
The control panel has four keys: ON/OFF, SET/↓/↑ for operation of temperature setting and edit the program .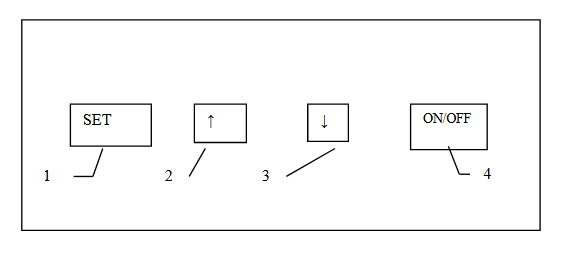
Figure 2
1. “ON/OFF” key: When press this key,the system switches between the two states of starting heating control and stopping heating control.
2. “SET” key: This key is valid when system is in the stop heating control state ,that is, the LED indicator is off , press this key to enter into temperature setting state , the LED indicator is green , and it shows set temperature value , and temperature value can be adjusted by pressing “↓ /↑” Key . And it is invalid when it is in the starting heating state .
3. “↑” key , this key is valid when the system is in the temperature setting state, press this key to add the value of temperature. And it is invalid in the other states .
4. “↓” key , this key is valid when the system is in the temperature setting state, press this key to reduce the value of temperature. And it is invalid in the other states .
5. Operation
Connect the power line, then turn on the power switch. After the system is turned on, the LED light does not light up. The system defaults to the heating control state, and the current actual temperature is displayed.1). Press “SET” key, the LED indicator is green and shows the set temperature , adjust the temperature values by pressing “↓/↑” key to the required temperature.
2). Press “ON/OFF” key, the instrument starts heating and the set temperature values are saved. The temperature does not need to be reset next time. If the current temperature is lower than the set temperature, the LED indicator is red and twinkles and the twinkle frequency changes with the system temperature. If current temperature reaches to the set temperature, the LED indicator is orange and when the system is stable, the temperature will be controlled within a range of plus or minus one degree from the temperature setting.
3). If the heating control is no longer needed, press “ON/OFF” key again, the LED does not light up, the system stops the heating control and returns to the initial state.
6. Appendix
●Product AlterationThe rights of altering the technological parameters of the product without notifying in advance, because the instruments required to face to the alteration and improvement for technological progress.
●Warranty Period
All instruments manufactured by the company have been strictly and comprehensively checked on quality to guarantee the compliance with the technological standard.
The warranty conditions will be up to the agent responsible to you.
The warranty period is only valid for normal usage according to the specified conditions for the instrument and the circumstances of following the various regulations specified in the operational instruction manual.
Warranty terms are not applicable for the damages caused by misuse or improper operations of instrument and our company is not responsible for the above-mentioned damages either.
●Discard and Disposal
The discarded instrument or parts of instrument shall be disposed according to the existing relevant and effective laws and regulations.
We are pleased to offer you an environment-friendly disposal plan when you need to dispose the discarded BPTR-101 Paraffin trimmer
●User’s Service Information
Please contact the sales representative of Biolab or the sales agent once sold the instrument to you if you require any service or parts during the warranty period. Please inform the instrument model, serial number and supply time.