


Glassware Washer BGLW-102
- Sea, Air, Door to Door Shipping
- 1 Year Warranty
- US & European Standards
Lab Automatic Glassware washer is an automatic machine for the process of washing, disinfection and drying of various laboratory equipment such as flasks, beakers, pipettes and so on. Washing carried out through air heater and HEPA filter facilitates by drying
- High efficient cleaning system, designed with European reliable pump, optimized spray arm and nozzles and self-cleaning program.
- Rapid and efficient drying system, designed with independent air heater, HEPA filter and drying process
- Water heating temperature can reach 99°C , while hot air drying temperature can reach 120°C
- Professional configuration design-stainless steel for corrosion resistance; reinforced glass window mounted to achieve a clear view on washing process
Specification
Features
Applications
| Capacity | 220 L |
| Water Consumption Cycle | 20 L |
| Inlet Water Pressure | 0.3~0.8 Mpa |
| Noise | ≤ 55 dB |
| Material | Internal Material: SS316, Outer Material:SS304 |
| Overall Power Consumption | 6/17 KW |
| Power Consumption- Water Washing | 0.75 KW |
| Power Consumption- Water Heating | 5/15 KW |
| Power Consumption-Drying | 3.6 KW |
| Power Supply | AC220 V, 50 Hz , 380 V ,50Hz (Standard) 110V , 60 Hz (Optional) |
| Cleaning Rack | 2 pcs |
| Standard Cleaning Rack | BKIR36 x 2 |
| Standard Accessories | USB interface, One Bucket RBS A 156 leaner (1L), One Bucket RBS A 375 neutralizer (1L) |
| Optical Accessories | Cleaning Racks |
| Washer Chamber Size (WxDxH) | 600x629x690 mm |
| External Size (WxDxH) | 690x790x1820 mm |
| Package Size (WxDxH) | 790x940x1990 mm |
| Gross Weight | 300 kg |
- High efficient cleaning system, designed with European reliable pump, optimized spray arm and nozzles and self-cleaning program.
- Rapid and efficient drying system, designed with independent air heater, HEPA filter and drying process
- Water heating temperature can reach 99°C , while hot air drying temperature can reach 120°C
- Professional configuration design-stainless steel for corrosion resistance; reinforced glass window mounted to achieve a clear view on washing process
- PLC touch screen control with present 12 programs and 99 customized programs
- Safety protection-electronic security door lock to prevent unexpected door opening , water & drying air temperature dual control and equipped with emergency switch.
Used in University , Research institution, Pharmaceutical, Chemical industry, Microbiology Lab
Operating Manual for BGLW-102
1. Safety Guides
2. Summary
2.1 Application
2.2 Technical Specifications
3. Installation
3.1 Conditions
3.2 Placement
3.3 Installation
4. Operation Guides
4.1 Structure View
4.2 Load the washing rack
4.3 Operation
4.4 Operation system
4.5 Loading Instruction
4.6 Liquid Agent Adding
5. Maintenance
5.1 Regular Maintenance
5.2 Functions Inspection
5.3 System Clean-up
5.4 Worn Parts Replacement
5.5 Trouble Shooting
Appendix
1. Washing Parameters of Pre-set Programs
2. Packing List
3. Service Information
1. Safety Guides
1. Electrical Safety Guides1.1 A separate power source with circuit breaker must be used.
1.2 The power source must be grounded.
1.3 It is prohibited to extend, stretch, tie or stress the power cord. And the power cord should not be dangerously bended or folded.
1.4 The machine must be powered off before any repair or maintenance. Also, please wait till the pipes have cooled down for any further action.
1.5 The machine must be powered off with the power cord well placed, if the machine will not be used for a long time.
2. Operation Safety Guides
2.1 The machine has electronic lock, and for safety reason, to avoid any human injury by hot water or hot air, DO NOT try to open the door during its running. For emergency, please press the button “Emergency Stop”(if applicable) or cut-off the power supply at first, wait until the water or air temp reaches its safety level for further actions.
2.2 During the machine running, click “Force to Quit” to stop washing.
2.3 During normal operation, if abnormal sound or smell is found, please stop the machine right away for inspection or contact the seller for warranty service.
2.4 During normal operation, if the machine stops working suddenly, please do inspection right away or contact the seller for warranty service.
2. Summary
2.1 Application
This machine is a fully automatic machine for washing, disinfecting and drying, which is suitable for pharmaceutical companies, research institutions, universities, food factories, testing organizations customers to wash the regular glassware, such as test tubes, flasks, beakers,2.2 Technical Specifications
| Model | BGLW-101 | BGLW-102 | BGLW-103 | ||
| External Dim. (WxDxHmm) | 980*740*870 | 690*790*1820 | 690*790*1970 | ||
| Internal Dim. (WxDxHmm) | 600*629*465 | 600*629*690 | 600*629*820 | ||
| Washing Chamber Dim. (WxDxHmm) | 570*600*420 | 570*600*600 | 570*600*760 | ||
| Input Voltage | 220/50 | 220/50 | 380/50 | 220/50 | 380/50 |
| Water Heating Power | 5kw | 5kw | 15kw | 5kw | 15kw |
| Circulating Pump Power | 0.75kw | 0.75kw | 1.5kw | ||
| Drying Fan Power | 0.25kw | 0.75kw | 0.75kw | ||
| Drying Power | 2.1kw | 3.6kw | 3.6kw | ||
| Overall Power Consumption | 6kw | 6kw | 17kw | 17kw | |
| Water Inlet Pressure | 0.3~0.8Mpa | ||||
Table 1
3. Installation
3.1 Conditions
| Environment | Temperature: 5℃~35℃; Humidity: ≤85%; Barometric pressure: 80 kPa~106 kPa; Note: Do not use the machine in a dusty, dirty, vibrating or outdoor place |
| Placement | The machine should be placed within the range of 2 meters from power source and water source. |
| Power Supply | A separate circuit breaker or control switch should be used, and the machine should be well grounded. Power source should be 80cm higher than ground level. |
| Water Supply | Water inlet pressure: 0.3~0.8Mpa Pure water and tap water Power source should be 80cm higher than ground level. |
| Draining | The ID of drain outlet should be bigger than 55mm and 5cm at max high than ground level. |
| Ground | Flat floor and height difference within 1㎡ areas should be less than 5mm. The floor bearing should be heavier than 1T/㎡. |
Table 2
3.2 Placement
1) Dismount outer package, according to the packing list, make sure if the accessories are complete and are in good condition.2) Place the machine to the installing spot, adjust the leveling feet to make sure it is at horizontal position.
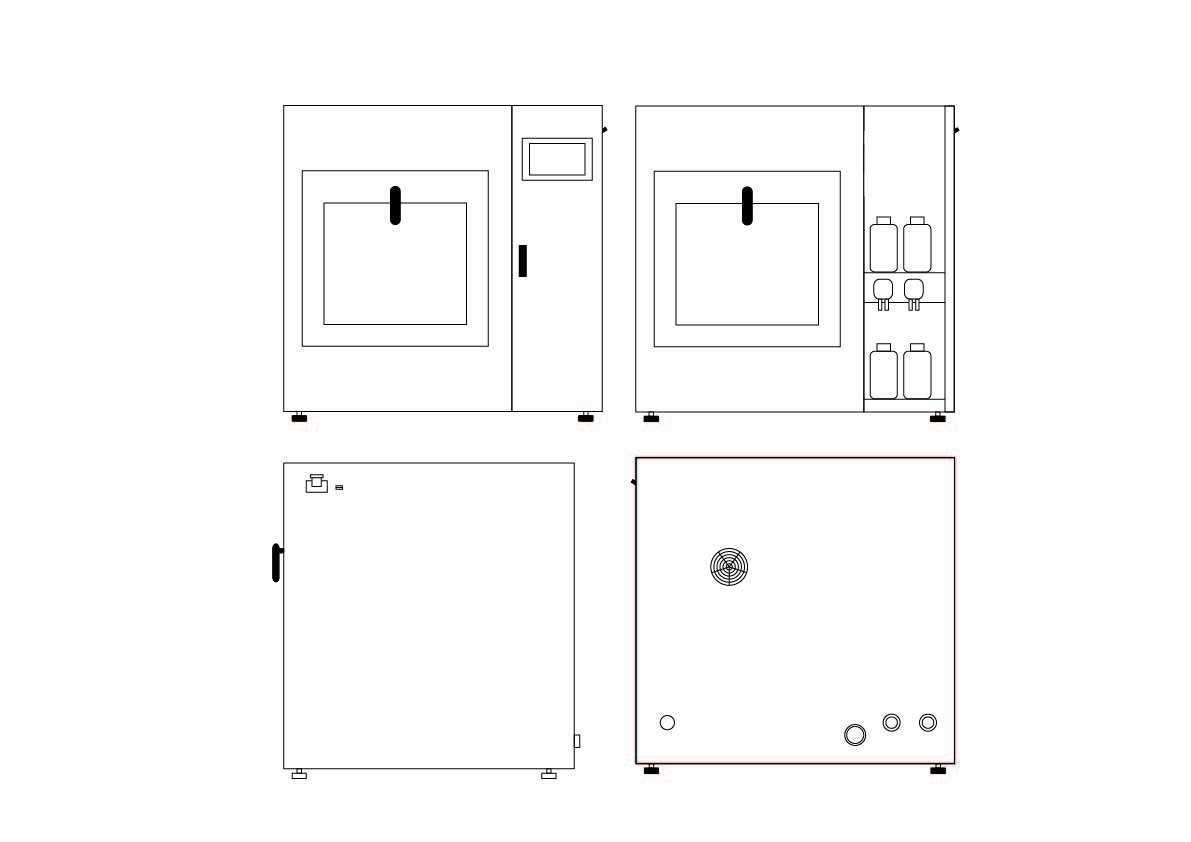
Figure 1
3.3 Installation
3.3.1 Structure View
BGLW-101
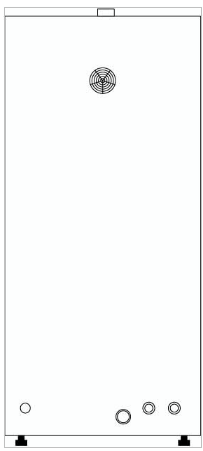
BGLW-102/BGLW-103
1. Power Cord
2. Draining outlet
3. Pure Water Inlet
4. Tap Water Inlet
3.3.2 Power Supply
 | The electrical installation must be implemented by professional engineers. |
| A separate power source with circuit breaker must be used. | |
| The power source must be well grounded. | |
| Please make sure the power cord is tightly connected. |
Table 3
| 380V/50Hz, Circuit breaker: 4P Rated current: 60A | 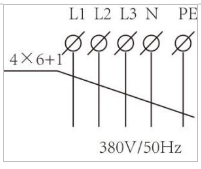 |
| 220V /50Hz, Circuit breaker: 2P Rated current: 40A | 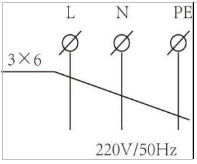 |
Table 4
3.3.3 Water Supply
| Pure Water Inlet Connect the G3/4 screwed conduit to the pure water inlet on the machine and the other end to the pure water faucet. | 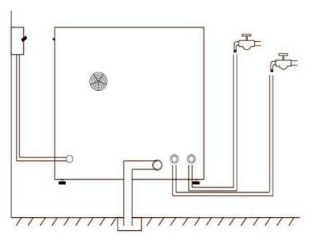 |
| Tap Water Inlet Connect the G3/4 screwed conduit to the tap water inlet on the machine and the other end to the tap water faucet. | |
| Draining Tightly clamp the drain pipe(φ25mm), and connect to the floor drain (the floor drain position must be lower than the machine outfall). |
After finishing the connections of water supply, please turn on the water faucets to make sure no water leakage at each joint.4. Operation Guides
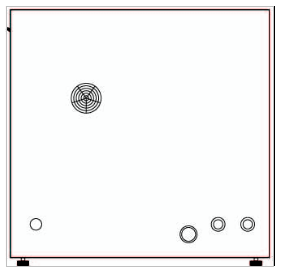
4.1 Structure View
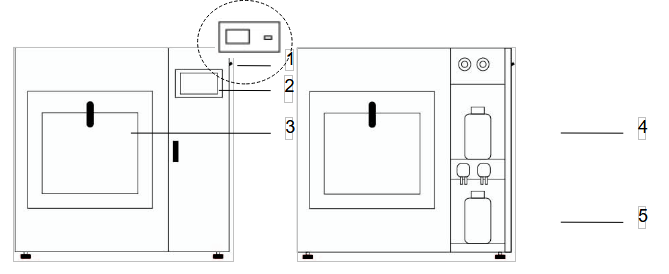
Figure 2
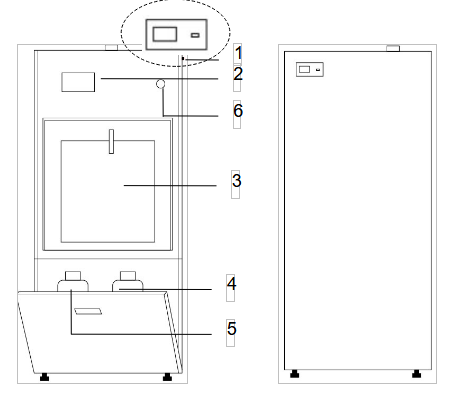
Figure 3
1. Power Switch, USB Interface; 2. LCD Touch Screen Controller; 3.Watch Window;
4. Detergent Container; 5. Neutralizer Container; 6. Emergency Stop Button
4.2 Load the washing rack
4.2.1 Washing rack installation
Step1Pull out the slide rails on maximum position
Step2
Place the washing rack on the slid rails and contact the port in below picture


Figure 4
4.2.2 Ware washing loading height
Max. height of flask or bottle reference table:| Model | BGLW-101 | BGLW-102 | BGLW-103 |
| Washing rack(Layer) | 1 | 2 | 3 |
| Up layer height(mm) | / | 245 | 225 |
| Middle layer height(mm) | / | 225 | |
| Bottom layer height(mm) | 345 | 235 | 115 |
Table 5
4.3 Operation
4.3.1 Preparation

Figure 5
1) Turn on the water supply faucet and power supply
2) Turn on the power switch, and the start-up menu will be entered.
3) Load the items onto the washing rack, and close the door clockwise in 90 degrees.
• Make sure when put the rack back into the machine, the water inlet on the rack should be at your right side as shown in above No.1.• Make sure the inlet No.1 on the rack to match up with the inlet No.2 shown above inside the chamber, when putting the rack back into the machine.
• The loaded items cannot be contacted with the spray arm No.3 as shown above at the top inside the chamber.
• The diameter of the loaded items must be less than the distance between two spray columns, in order to avoid any broken during washing.
4.3.2 Washing Program Selection
Users can select the washing program, which is pre-set or user-defined, according to their specific requirements. Some of the parameters setting are listed below,1) Pre-set Program
Take the Default washing program as an example,
| • Step 1 Click ”Glassware Washer” at the start-up screen to enter the main menu |  |
| • Step2: Click “Account”,select Operator “Password Login” (Note: This Equipment’s has the authorized management, user must input the correct password to access ) | 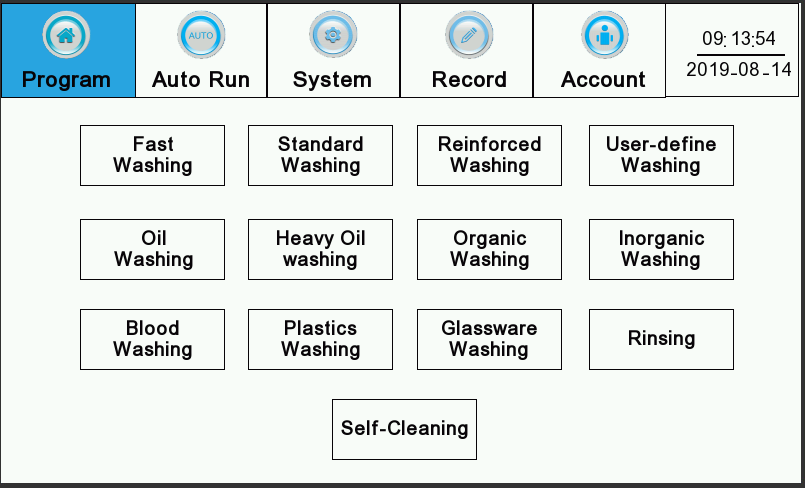 |
| • Step3: Enter initial password “111” or “222”,click “Yes”, then click “Program” | 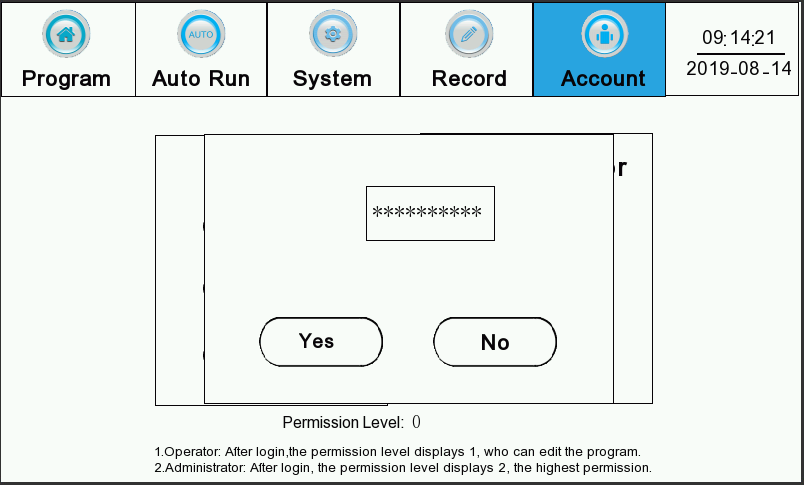 |
| • Step4: Click “Standard Washing”. | |
| • Step5: Set the parameters as per above sheet. click“Save”,then click“Auto Run”. | 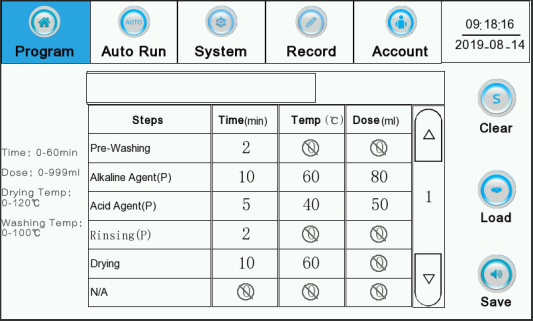  |
| • Step6: Click“Start” | 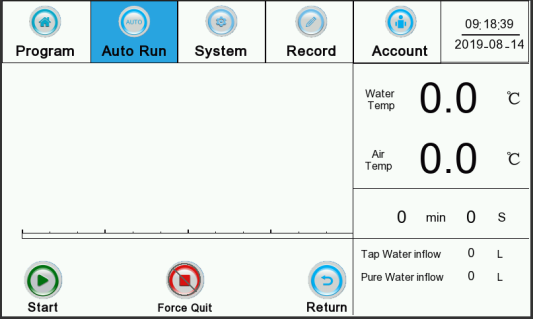  |
2) User-define Washing
User-define Washing can set the program name, store Max.99 programs
| • Step1: After login the system, click “Program” then click “User-define Washing” | |
| • Step2: Click name box, popup the input window, input “Test tube”,then click “Save”. (Program name Max. 12 characters) | 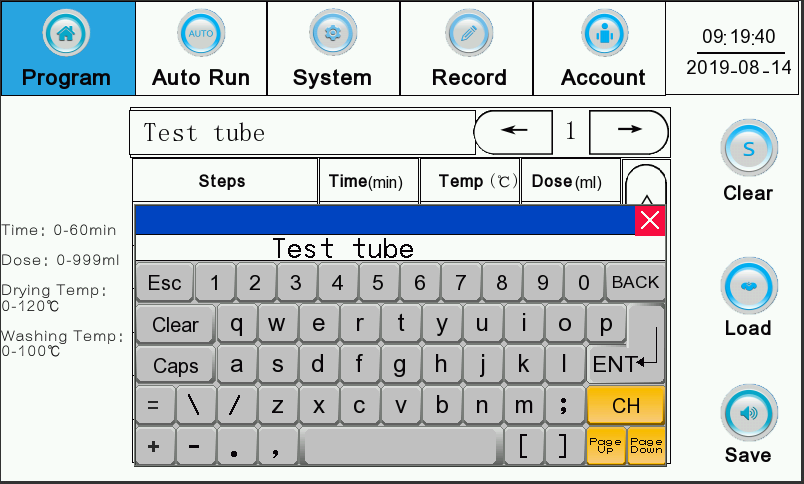 |
4.4 Operation system
4.4.1 Programs
| • Number of Program 12 washing programs Fast Washing, Standard Washing, Reinforced Washing, Heavy Oil Washing, Organic Washing, Plastic Washing, Blood Washing, Oil Washing, Inorganic Washing, Glassware Washing, Rising, User-Define Washing. | |
| • Program’s Steps Washing steps and its parameters are adjustable in each program. Each washing program can set Max. 12 steps, select the steps by clicking page up/down | 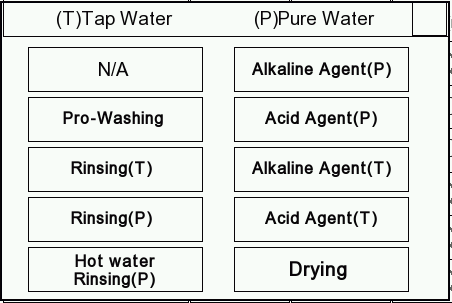 |
| • User-define program User-define program can set and modify program name, Store Max. 99 programs. | |
Steps Description
| No. | Name | Notes |
| 1 | N/A | Not applicable |
| 2 | Pre-washing | Washing by tap water (as default) |
| 3 | Rinsing (P) | Select to rinse by pure water |
| 4 | Rinsing (T) | Select to rinse by tap water |
| 5 | Hot Water Rinsing (P) | Select to disinfect by hot pure water |
| 6 | Alkaline Agent (P) | Select to wash by pure water with detergent added |
| 7 | Acid Agent (P) | Select to wash by pure water with neutralizer added |
| 8 | Alkaline Agent (T) | Select to wash by tap water with detergent added |
| 9 | Acid Agent (T) | Select to wash by tap water with neutralizer added |
| 10 | Drying | Select to dry by the hot air through HEPA filter |
Notes: P means Pure water, T means Tap water. Pre-washing is default by Tap water.
4.4.2 Auto-Run Screen
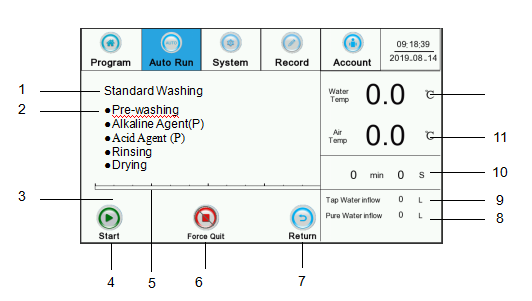
Figure 6
| No. | Item | Introduction |
| 1 | Program name | Display the program name |
| 2 | Program step | Display all washing steps |
| 3 | Equipment status | Display equipment status, alarm information is displayed here |
| 4 | Start | Program start button. When the program starts, this button is locked and can not click again. |
| 5 | Time progress bar | Real-time display the program runs time schedule |
| 6 | Force Quit | Stop the running program |
| 7 | Return | Return to the program selection interface |
| 8 | Pure water inflow | Real-time display pure water inflow volume in current program step. |
| 9 | Tap water Inflow | Real-time display pure water inflow volume in current program step |
| 10 | Time | Cumulative run time |
| 11 | Air Temperature | Real-time display drying temperature |
| 12 | Water temperature | Real-time display washing temperature |
Table 6
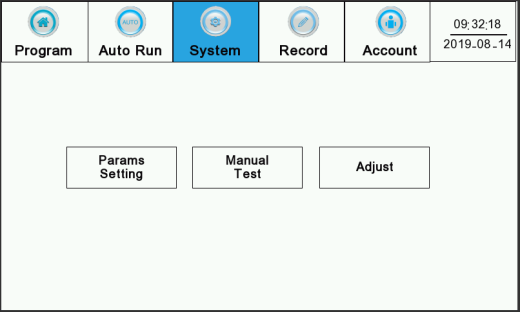
4.4.3 System
System parameters includes parameters setting, manual test and adjust (date, Dos, temperature.(note: System function is mainly for service engineer to debugging and maintenance.)
4.4.4 Record
1) Washing Record| • Step1: Click “Record”, then click “Washing Record” | 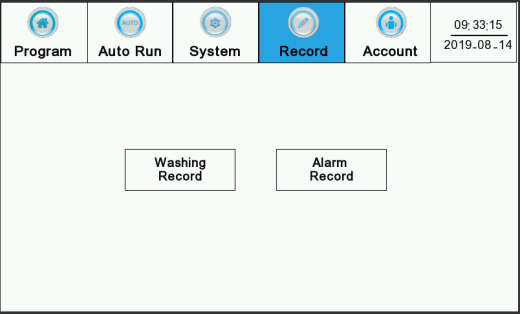 |
| • Step2: 1) View record, select the record “ click the “check chosen” 2) Record output” Insert the U disk, click “export chosen” 3) record print: Choose the one record, click “Print” (Note: Only insert the U disk, it can display the export record.) | 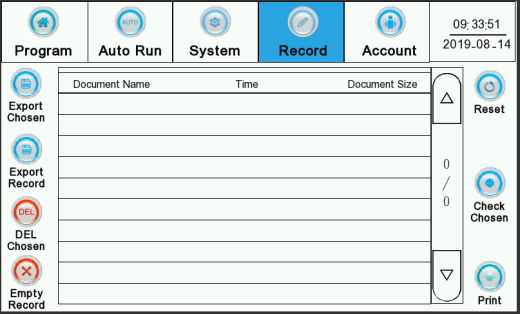 |
2)Alarm record
| • Step1: Click “Record”, then click “Alarm Record” | |
| • Step2: All alarm records are displayed. All alarm records are exported. | 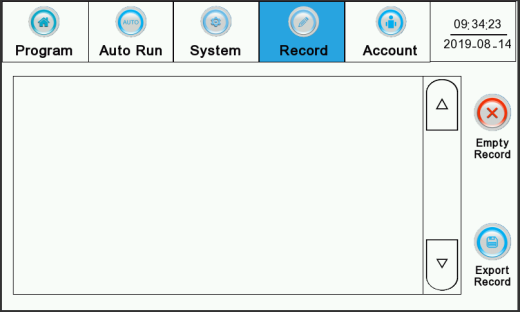 |
4.4.5 Account
1) Code Management| Code Level | Initial Passwords | Limits of Authority |
| Level 1 | N/A | Select and start program, can not change parameters Check, export and print the washing records, can not delete the records check alarm record, can not delete the record |
| Level 2 | 111 | can do level 1 change washing program parameters |
| Level 3 | 222 | All can do. |
Table 7
Note: Logging by the high priority password can change the other two levels passwords.
2) Password Logging
To access different levels of control, the passwords with different levels of priority should be used to login at first.
| • Step1 Click ”Enter” at the start-up screen to enter the main menu. | 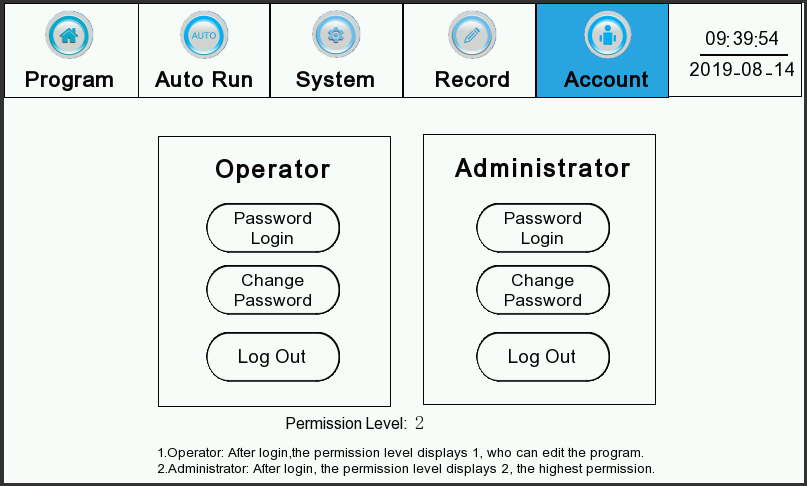 |
| • Step2 Click “Code Login” to input the relevant password. Click “enter” to confirm and “x” to quit the input box. |  |
3) Password Change
| • Step1 Click ”Change Password” | |
| • Step2 Click “Code Login” to input the high priority password. Click “enter” to confirm and “x” to quit the input box. | 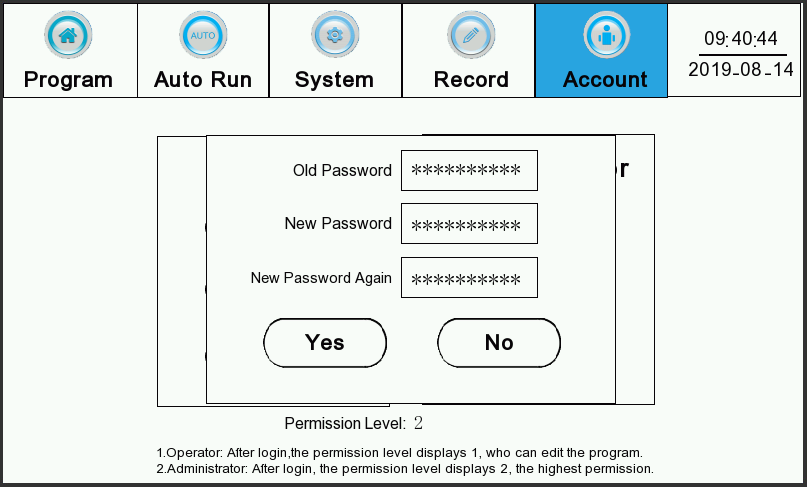 |
• Memory Function
The machine has a memory function if its power supply is cut off but gets recovered within 15 minutes. The machine will enter its Auto-Run screen, and click “Start” to start washing according to the step as it was running before the power was cut off.
4.5 Loading Instruction
| Model | BGLW-101 | BGLW-102 | BGLW-103 | |
| Effective Height | Single Level (mm) | 345 | 525 | 685 |
| Upper Level (mm) | * | 245 | 110 | |
| Middle Level (mm) | * | 235 | ||
| Lower Level (mm) | * | 235 | 235 | |
| Effective Capacity (L) | 120 | 220 | 320 | |
| Washing Level | 1 | 2 | 3 | |
Table 8
4.6 Liquid Agent Adding
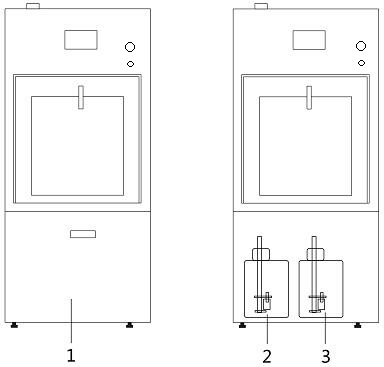
Figure 7
| No. | Description | Notes |
| 1 | Area to place liquid agents | Open the lower secondary door to access |
| 2 | Detergent container | DO NOT place the two barrels in a wrong position. |
| 3 | Neutralizer container | DO NOT place the two barrels in a wrong position. |
Table 9
There will be indication message shown on the screen when the liquid agents are in short supply. So, please add the agents accordingly as per the following steps,
1) Open the secondary door, screw off the cap of the agent barrel, and take out the barrel.
2) Add the liquid agent into the relevant barrel and put the barrel back into its original position with its cap tightly screwed on.
3) After adding the agents, indication message on the screen will be disappeared.
5. Maintenance
5.1 Regular Maintenance
The maintenance period depends on the using frequency and components physical lifespan. The maintenance periods of the components are as following.| Parts | Annual Check | Replaced if needed | Annual Replace | Replaced every two years | Checked if needed |
| Filter net inside the washing chamber | ● | ||||
| Water over-heated protective switch | ● | ||||
| Drying-box protective switch | ● | ||||
| HEPA filter | ● | ||||
| Emergency stop button | ● | ||||
| Filter net of water inlet valve | ● | ||||
| Plastics of spray arm | ● | ||||
| Additives hoses | ● | ● | |||
| All water pipes | ● |
Table 10
5.2 Functions Inspection
| Verification Contents | Annual Check | Replaced if needed |
| Check if power switch runs in order, make sure the power cord is in good condition. | ● | |
| Check if water heating pipe, fan, dry heating pipe, circulation pump, drainage pump, metering pump, liquid leveling sensor, position switch and water inlet valve runs in order. | ● | |
| Check if all the electric elements in the control box are working properly in good condition. | ● |
Table 11
5.3 System Clean-up
5.3.1 Circulating System CleaningTo clean the circulating system, the self-clean program can be used.
| • Step1 Click “Self-clean” at the main menu. | |
| Step2 Set the time as 30min. Click “Start” and the water will be filled automatically into the washer (the machine will not be started to run at this moment). | 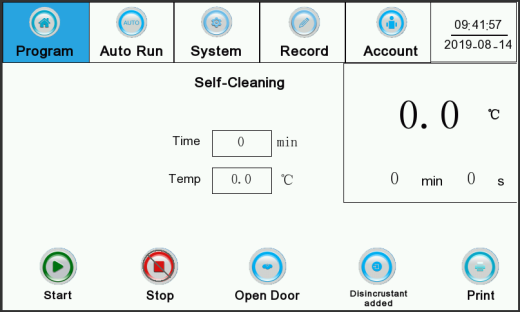 |
| • Step3 Click “Door Open” to open the door manually and add disincrustant into the washing cabinet, and then close the door. | |
| Step4 Click “Finish Adding Disincrustant”. At this point, the washer will start to run for cleaning and water drainage will be done automatically once the process is completed. |
5.3.2 Rack Cleaning
Take the washing rack#CWIR222 as an example,
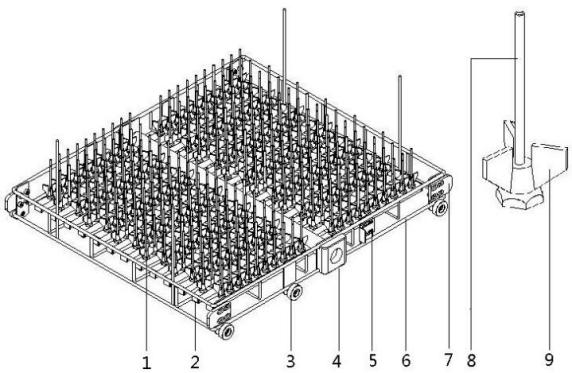
Figure 8
1) Parts on the rack
| No. | Parts | No. | Parts |
| 1 | Distributive Pipe | 2 | End Cap |
| 3 | Nylon Wheel | 4 | Water Inlet Joint |
| 5 | Side Board | 6 | Frame |
| 7 | Stop Block | 8 | Spray Column |
| 9 | Bracket | * | * |
Table 12
2) How to clean
| Issues | Cleaning Methods |
| Distributive Pipe Block | 1) Use screwdriver to unscrew the screws in the position#2 and take off the end cap. Clean the distributive pipes by hairbrush. 2) Get the taken-off parts assembled back. |
| Spray Column Block | Take off the spray column by wrench and clean it by wire rod from top to bottom. |
Table 13
5.4 Worn Parts Replacement
5.4.1 Additives Hose Replacement
1) Take off the clips at the No.8, and replace the suction hose between the additives barrels and metering pump.2) Take off the clips at the No.5, and replace the injection hose between the metering pump and washing chamber.
3) Assemble the clips back after replacing the hoses.
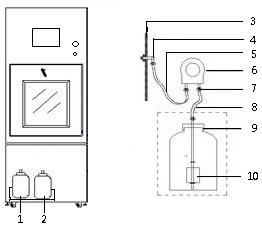
Figure 9
| No. | Parts | No. | Parts |
| 1 | Detergent Barrel | 2 | Neutralizer Barrel |
| 3 | Side Wall of Washing Chamber | 4 | Stainless Steel Fixer |
| 5 | Injection Hose | 6 | Peristaltic Pump |
| 7 | Plastic Clip | 8 | Suction Hose |
| 9 | Seal Cap | 10 | Liquid Level Switch |
5.4.2 HEPA Filter Replacement
1) Open the left side panel of the machine to find out the location of HEPA filter.2) Separate the filter carrying box with the intake air pipe as shown below, take out the filter inside the box and change to a new one.
3) Get the filter carrying box back to its original location, connecting to the blast pipe.
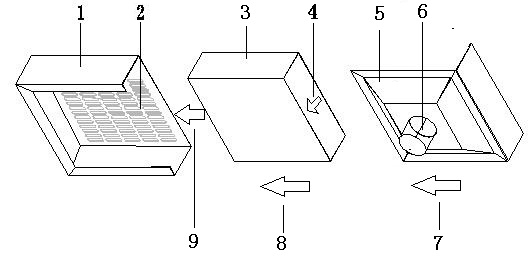
Figure 10
| No. | Parts | Notes |
| 1 | Carrying Box | To carry the HEPA filter inside |
| 2 | Vent Hole | Where the air go through |
| 3 | HEPA Filter | Filtering efficiency 99.99%(assembled as show above) |
| 4 | Direction Sign | Assembling must be complied with this sign of intake air. |
| 5 | Guard Board | To protect the filter inside |
| 6 | Air Outlet | Connect to the fan (φ50mm) |
| 7 | Direction Sign | Assembling directions (8/9) |
5.5 Trouble Shooting
5.5.1 General Failures
In case of failure, the warning will be shown on the display and explained as below,| No. | Warning on Display | Possible Reasons | Actions to Take |
| 1 | Door open | Door opened or signal switch broken | Close the door or ask for warranty service |
| 2 | Detergent shortage | Detergent used out or leveling switch broken | Add detergent or ask for warranty service |
| 3 | Neutralizer shortage | Neutralizer used out or leveling switch broken | Add neutralizer or ask for warranty service |
| 4 | Malfunction on water heating | Water heating pipe or temp controller broken | Ask for warranty service |
| 5 | Malfunction on air heating | Air heating pipe or temp controller broken | Ask for warranty service |
| 6 | Malfunction on pure water inlet | Pure water inlet valve blocked or broken | Clean the valve or replace the parts |
| 7 | Malfunction on tap water inlet | Tap water inlet valve blocked or broken | Clean the valve or replace the parts |
| 8 | Malfunction on draining | Draining delay: draining pipe or floor drain is blocked; Draining pump or draining solenoid blocked or broken | Clean the pipe or floor drain; Replace the parts; |
Table 14
5.5.2 Others
| Malfunctions | Possible Reasons | Actions to take |
| The washer does not work | 1) No power supply 2) Main power switch is not turned on. 3) Emergency stop button is not got re-set. | 1) Check out the power cord and power source 2) Turn on the power switch 3) Re-set the emergency stop button |
| Bad washing effects | 1) Washing pipes are blocked 2) Improper placement of washed items 3) No detergent or neutralizer added 4) Filter net in the chamber is blocked. | 1) Clean spray arm, spray column and water pipelines on the rack 2) Load the items as per the instruction 3) Use the suggested washing detergent/neutralizer 4) Clean the filter net before use. |
Table 15
Appendix
1. Washing Parameters of Pre-set Programs
1) Setting Range| Name | Unit | Set Range | Remark |
| Dispensing | ml | 0~999 | Add 100ml every 60 seconds |
| Time | min | 0~60 | * |
| Washing Temp | ℃ | 0~100 | * |
| Drying Temp | ℃ | 0~120 | * |
2) Program
| Program name | Step | Step Description | Temp (℃) | Time (min) | Water Supply | Dispensing Vol.(ml) |
| Fast Washing | 1 | Alkaline Agent(P) | 60 | 10 | Tap Water | 80 |
| 2 | Acid Agent(P) | 50 | 5 | Pure Water | 50 | |
| 3 | Rinsing | RT | 2 | Pure Water | RT | |
| 4 | Drying | 60 | 10 | RT | RT | |
| User-defined Washing | 1 | Pre-washing | RT | 2 | Tap Water | RT |
| 2 | Pre-washing | RT | 2 | Tap Water | RT | |
| 3 | Alkaline Agent(P) | 60 | 10 | Pure Water | 80 | |
| 4 | Alkaline Agent(P) | 50 | 5 | Pure Water | 50 | |
| 5 | Acid Agent(P) | 60 | 10 | Pure Water | 80 | |
| 6 | Acid Agent(P) | 50 | 5 | Pure Water | 50 | |
| 7 | Rinsing | RT | 2 | Pure Water | RT | |
| 8 | Rinsing | RT | 2 | Pure Water | RT | |
| 9 | Rinsing | RT | 2 | Pure Water | RT | |
| 10 | Drying | 60 | 10 | RT | RT | |
| Oil Washing | 1 | Pre-washing | RT | 2 | Tap Water | RT |
| 2 | Alkaline Agent(P) | 60 | 10 | Tap Water | 80 | |
| 3 | Acid Agent(P) | 50 | 5 | Pure Water | 50 | |
| 4 | Rinsing | RT | 2 | Pure Water | RT | |
| 5 | Rinsing | RT | 2 | Pure Water | RT | |
| 6 | Drying | 60 | 10 | RT | RT | |
| Reinforced Washing | 1 | Pre-washing | RT | 2 | Tap Water | RT |
| 2 | Alkaline Agent(P) | 70 | 10 | Pure Water | 100 | |
| 3 | Alkaline Agent(P) | 60 | 5 | Pure Water | 80 | |
| 4 | Acid Agent(P) | 70 | 10 | Pure Water | 80 | |
| 5 | Acid Agent(P) | 50 | 5 | Pure Water | 50 | |
| 6 | Rinsing | RT | 2 | Pure Water | RT | |
| 7 | Drying | 60 | 10 | RT | RT | |
| Organic Washing | 1 | Hot Rinsing | 60 | 2 | Pure Water | RT |
| 2 | Alkaline Agent(P) | 70 | 10 | Tap Water | 80 | |
| 3 | Acid Agent(P) | 50 | 5 | Tap Water | 50 | |
| 4 | Hot Rinsing | 60 | 2 | Pure Water | RT | |
| 5 | Hot Rinsing | 60 | 2 | Pure Water | RT | |
| 6 | Rinsing | RT | 2 | Pure Water | RT | |
| 7 | Drying | 60 | 10 | RT | RT | |
| Inorganic Washing | 1 | Acid Agent(P) | 50 | 5 | Tap Water | 50 |
| 2 | Alkaline Agent(P) | 60 | 10 | Tap Water | 80 | |
| 3 | Acid Agent(P) | 50 | 5 | Tap Water | 50 | |
| 4 | Rinsing | RT | 2 | Pure Water | RT | |
| 5 | Rinsing | RT | 2 | Pure Water | RT | |
| 6 | Rinsing | RT | 2 | Pure Water | RT | |
| 7 | Drying | 60 | 30 | RT | RT | |
| Standard Washing | 1 | Pre-washing | RT | 2 | Tap Water | RT |
| 2 | Alkaline Agent(P) | 60 | 10 | Pure Water | 80 | |
| 3 | Acid Agent(P) | 50 | 5 | Pure Water | 50 | |
| 4 | Rinsing | RT | 2 | Pure Water | RT | |
| 5 | Drying | 60 | 10 | RT | RT | |
| Plastic Washing | 1 | Pre-washing | RT | 2 | Tap Water | RT |
| 2 | Alkaline Agent(P) | 60 | 10 | Pure Water | 80 | |
| 3 | Acid Agent(P) | 50 | 5 | Pure Water | 50 | |
| 4 | Rinsing | RT | 2 | Pure Water | RT | |
| 5 | Rinsing | RT | 2 | Pure Water | RT | |
| 6 | Rinsing | RT | 2 | Pure Water | RT | |
| 7 | Drying | 60 | 10 | RT | RT | |
| Glass Washing | 1 | Alkaline Agent(P) | 60 | 10 | Pure Water | 80 |
| 2 | Alkaline Agent(P) | 60 | 10 | Pure Water | 80 | |
| 3 | Acid Agent(P) | 50 | 5 | Pure Water | 50 | |
| 4 | Rinsing | RT | 2 | Pure Water | RT | |
| 5 | Rinsing | RT | 2 | Pure Water | RT | |
| 6 | Rinsing | RT | 2 | Pure Water | RT | |
| 7 | Drying | 60 | 10 | RT | RT | |
| Heavy-oil Washing | 1 | Alkaline Agent(P) | 70 | 10 | Pure Water | 80 |
| 2 | Alkaline Agent(P) | 70 | 10 | Pure Water | 80 | |
| 3 | Acid Agent(P) | 50 | 5 | Pure Water | 50 | |
| 4 | Rinsing | RT | 2 | Pure Water | RT | |
| 5 | Rinsing | RT | 2 | Pure Water | RT | |
| 6 | Rinsing | RT | 2 | Pure Water | RT | |
| 7 | Drying | 60 | 10 | RT | RT | |
| Blood Washing | 1 | Pre-washing | RT | 2 | Tap Water | RT |
| 2 | Alkaline Agent(P) | 60 | 10 | Pure Water | 80 | |
| 3 | Acid Agent(P) | 50 | 5 | Pure Water | 50 | |
| 4 | Rinsing | RT | 2 | Pure Water | RT | |
| 5 | Hot Rinsing | 60 | 2 | Pure Water | RT | |
| 6 | Drying | 60 | 10 | RT | RT | |
| Rinsing | 1 | Rinsing | RT | 3 | Pure Water | RT |
| 2 | Drying | 60 | 10 | RT | RT |
Note: if re-set the programs to be factory default, please click “Default”
2. Packing List
| No. | Items | Unit | Qty | Notes |
| 1 | The Washer | Unit | 1 | |
| 2 | Washing Rack | Unit | * | |
| 3 | Water Inlet Pipe | Pc | 2 | |
| 4 | Draining Pipe | Pc | 1 | |
| 5 | Liquid Paraffin | Bottle | 1 | |
| 6 | Detergent | Barrel | 1 | |
| 7 | Neutralizer | Barrel | 1 | |
| 9 | User Manual | Ea | 1 | |
| 10 | Draining Pipe Clip | Pc | 1 |
3. Service Information
1) The User and Product Information| Product | Model | ||
| S/N | Buying Date | ||
| User Name | Phone | ||
| Address | Post Code |
2) Service Records
| Date | Service Contents | Parts Replacement | Qty | Serviced By | The User Signature |
Note: the above contents should be filled by the service technician and signed for confirmation by the user. Please keep this service record card carefully for a future use.