


Cassette Printer BHTP-501
- Sea, Air, Door to Door Shipping
- 1 Year Warranty
- US & European Standards
Slide printer eliminates the need for writing and labeling by directly printing on the slides with precision.
- Laser printing and easy to maintain. Capability of linking with the management system of the pathology department. Laser etching on the surface of the embedding cassettes, no need for consumables. No need for preheating, can be immediately used after starting up, safe and noiseless, free of
- Maintenance.
Specification
Features
Applications
| Pringting method | Cassette Laser Printing |
| Average printing speed | ≤ 3S / Cassette |
| Printing accuracy | ≥ 1250 pi |
| Maximum Capacity | ≥ 75 Cassettes |
| Minimum Capacity | ≥ 1 slides |
| Power | 100-240 ACV 50/60 Hz |
| Standby power | 50 W |
| Rated Power | 100 W |
| Dimensions | 395x280x330 mm(LengthxWidthxHeight) |
| Laser Power | Pulse laser ≤ 2 W |
| System interface | Integrate with LIS/HIS/P IS |
| Printing Methods | Print online or off-line |
| Adhesion testing | Pull 1x10x30 mm 3M tape 3 times without fade |
| External device | Support Bar-code scanner inputting |
| Consumable items | Standard cassette |
- Laser printing and easy to maintain. Capability of linking with the management system of the pathology department. Laser etching on the surface of the embedding cassettes, no need for consumables. No need for preheating, can be immediately used after starting up, safe and noiseless, free of
- Maintenance.
Pathology, Cytology, Histology, Clinical Study Trials, Tracking of specimens
Operating Manual for BHTP-501
1.Overview
1.1 Equipment
1.2 Advantages
1.3 Basic Parameter
1.4 Using Condition
1.5 Main Structure
2. Installation of Cassettes and Filtration Device
2.1 Installation Steps
3. How to Use the Equipment
3.1 Power on
3.2 Power off
3.3 Print
3.4 Tips
4. How to Use the Software
4.1 Introduction
4.2 Start the software
4.3 Use the software
5. External Equipment
5.1 How to use the Barcode Scanner
6. Equipment Maintenance
7. Troubleshoot
7.1 Power on Fault
7.2 Software System Fault
7.3 Print Fault
7.4 Abnormal Print Result
7.5 Other Fault
8. After-sales Service
1.Overview
1.1 Equipment
BHTP-501 is a Cassette Laser Printer designed for standard cassettes, adopting ultraviolet laser printing and engraving. It is easy to operate. The printed content are clear and stable, and suitable for long-term storage. The device can be used for standard cassettes in pathology, histology, cytology, toxicology, and environment similar to laboratories.1.2 Advantages
① Clear printed content with 100% pass rate;② The average printing speed is 3 seconds per cassette (printing speed and clarity are
related to the content);
③ The equipment is stable, easy to operate and convenient;
④ The printed content is anti-corrosive and high temperature resistant, low temperature resistant, which can be preserved permanently.
1.3 Basic Parameter
| Category | Parameter |
| Type | No need for customized cassettes, any cassettes can be printed |
| Upload slot capacity | 1*75 |
| Download slot capacity | Print and take anytime |
| Dimension | 470×200×388 mm (L×W×H) |
| Print Accuracy | 2500dpi |
| Print Speed | 3 seconds per cassette |
Table 1
1.4 Using Condition
| ① Environment Temperature | 10℃~35℃ |
| ② Rated Voltage | 100V-240V 50Hz-60Hz |
Table 2
1.5 Main Structure
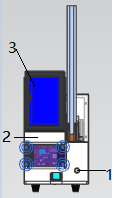
Figure 1
1 Power switch
2 exterior front panel
3 display panel
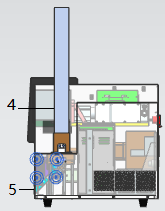
Figure 2
4 cassette hopper
5 cassette output
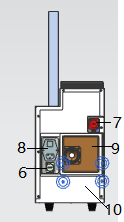
Figure 3
6 Network cable connector
7 USB connector
8 Power cord connector
9 Filtration replacement mesh
10 Enclosure back plate
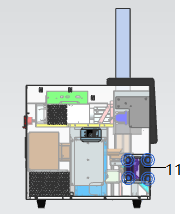
Figure 4
11 Maintenance door
2. Installation of Cassettes and Filtration Device
2.1 Installation Steps
1. Pull out the “cassette hopper”;2. Insert the cassette in the direction shown below;
3. Insert “cassette hopper ”.
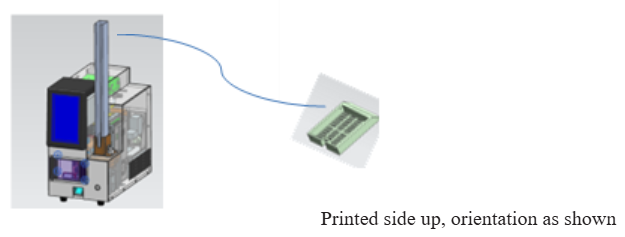
Figure 5
4. Take off the filter replacement mesh (the mesh is magnetic which can be taken off directly);
5. Put the filter element into the filter compartment (the black side of the filter element should face outwards, pay attention that the handle should face outwards when the filter element is placed)
6. Put the filter replacement mesh back (magnetic);
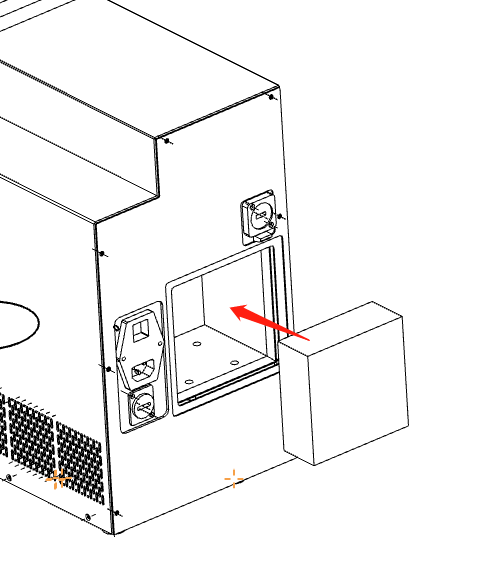
Figure 6
3. How to Use the Equipment
3.1 Power on
1. Connect the power cord;2. Turn on the power switch on the front of the device;
3.2 Power off
1. After the equipment has completely finished its work, press the power switch and check that the indicator light is off.2. When the equipment is not in use for an extended period, it is recommended to unplug the power cord.
3.3 Print
1. Load the cassettes to be printed into the hopper;2. Turn on the printer to automatically start the printing management software;
3. Set the cassette printing template (if no changes are needed, skip this step);
4. Enter the printing contents;
5. Start printing;
6. Take out the printed cassettes.
3.4 Tips
1. Connect the power cord of the equipment correctly;2. Do not insert any objects into the device during use;
3. Refer to “Part 7 Troubleshoot” for troubleshooting;
4. If there is any problem that cannot be solved, please contact our after-sales service in time;
4. How to Use the Software
4.1 Introduction
The cassette laser printer's management software system mainly includes three parts: a simple interface, home interface, and a menu interface.| ① Simple Interface | Switch between simple and normal mode; |
| ② Home interface | For editing and management of print tasks; |
| ③ Menu interface | For querying and deleting history records; |
Table 3
4.2 Start the software
The printer will automatically start the printing management software when it is powered on, and the display will be set on the simplified interface.4.3 Use the software
4.3.1 Simple Interface1. Start:When the device is available, click “Start” to print.
2. ** Expression is faulty **Task: Click “Task” to display the current task and completed task
3. Network: Click “Network” to display the network connection page
4. Stop: When printing, click “Stop” to stop printing.
5. Home: Click “Home” to display the home interface
6. Menu: Click “Menu” to enter the menu page
7. Close: Click “Close” to close the system
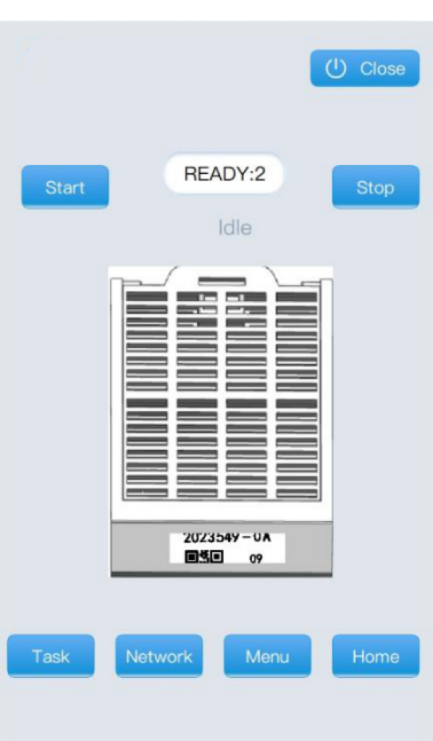
Figure 7
4.3.2 Home Interface
1. Menu: Click “Menu” to display the menu interface
2. Simple mode: Click “Simple mode” to display the simplified interface
3. Template editing area: Edit the task data.
4. Add: Click “add” to add a task to the end of the queue for printing. Click "Top Add" to prioritize the task for printing.
5. Print list: Click “Start Printing” to print the tasks one by one.
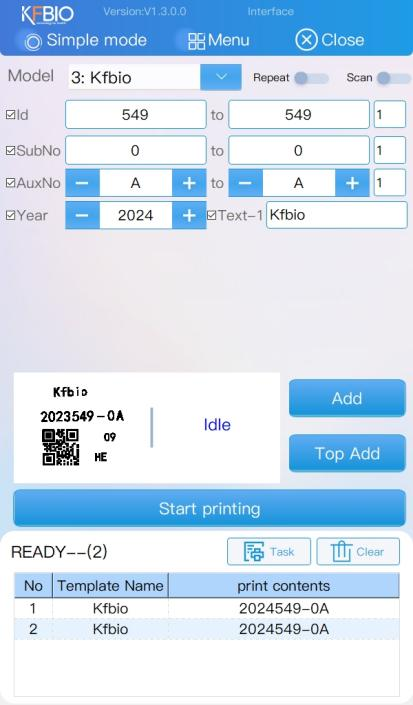
Figure 8
4.3.3 Menu Interface
1. Template design: Click “Template design” to enter the template design page.
2. Format options: Click “Format options” to set the data receiving format.
3. System Settings: Click “System Settings” to change the system settings.
4. Preferences: Click “Preferences” to customize your preferences.
5. Help Documents: Click “Help Documents” to view the help Documents.
6. About software: Click “About software” to enter the software related information page.
7. Software update: click “Software update” to upgrade the software.
8. Manufacturer maintenance: click “Manufacturer maintenance” to view the manufacturer maintenance options.
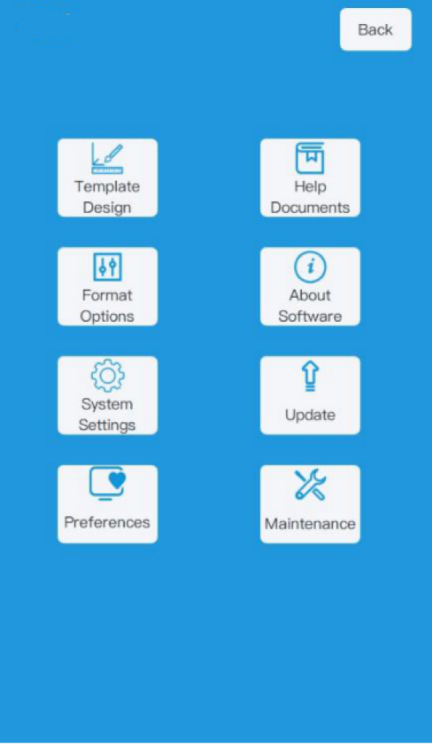
Figure 9
4.3.4 Regular Use
1. Current Task
When creating a new task, you can edit the template content. For example, to edit the pathology number, enter the range from 549 to 551 and click "Add." This will create three tasks with pathology numbers 549, 550, and 551. Other inputs, such as year or custom fields, will become fixed content for subsequent tasks.
To change the template, click“
 ”to expand the dropdown menu and select the desired template name. The content and image of the selected template will appear below.
Click "Add" to append the corresponding task data to the end of the print queue, increasing the number of pending prints accordingly. Click "Top Add" to add the task data to the beginning of the print queue.
Click "Start Printing" to begin the printing process. The button will change to "Stop Printing." Click "Stop Printing" to halt the printing process. Once it has fully stopped, it will revert to "Start Printing."
2. Completed tasks: At the bottom of the home interface, as shown in Figure 4, click “
 to delete all tasks to be printed, and click "Task" to enter the print queue editing page, as shown in the figure.
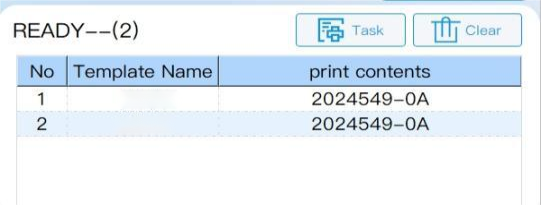
Figure 10
Enter the print queue editing page. Click “
”to select either the preparation list or the print list. The corresponding tasks will be isplayed. Navigation buttons are available at the bottom for flipping pages. In the preparation list, select a row and click "Delete" to remove the selected task.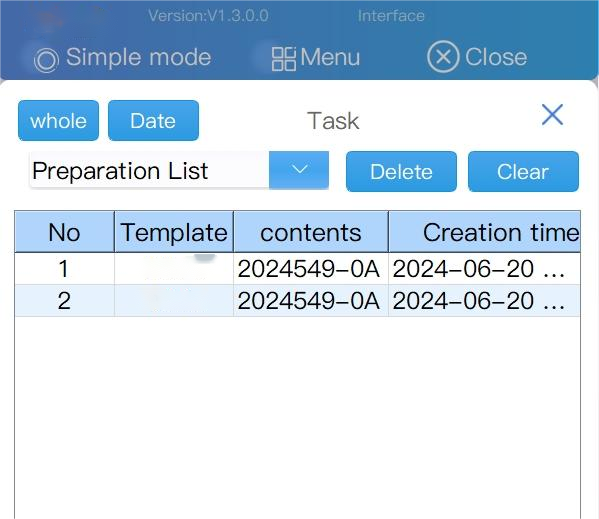
Figure 11
5. External Equipment
5.1 How to use the Barcode Scanner
By clicking the switch “ ”to activate the barcode scanner mode to scan the code. After scanning, the printer will automatically perform the printing operation. Wait for the printing to be completed, and then click the switch again to turn off the barcode scanner mode.
6. Equipment Maintenance
The cassette laser printer primarily involves laser emission devices and control systems, and long-term use may cause damage to the equipment. To extend the service life of the equipment, regular maintenance and upkeep should be carried out as follows:The equipment should be placed in a dry and clean environment. Do not pile up other debris around the printer to ensure enough heat dissipation. Regularly inspect equipment components for looseness to ensure reliable connections. Do not use alcohol, laundry detergent, etc., to wipe the screen. If necessary, you can use wet wipes or a damp cloth, but do not let water flow into the device. Ensure that the mobile device is level, handle it gently, and avoid damage to the laser equipment caused by violent vibrations. During use, do not cut off the power suddenly. Ensure to follow the correct process to exit and turn off the power. Regularly check the fan to ensure its normal operation and avoid secondary injury caused by excessive temperature due to the fan not running. To extend the service life, turn off the equipment when it is not in use and restart it regularly when it is in long-term operation. Regularly maintain the equipment every three month of printing. Do not disassemble the equipment randomly. If there are any problems, please contact our maintenance personnel in a timely manner.
7. Troubleshoot
7.1 Power on Fault
1. Power switch is not turned on, Turn on the power switch2. Power cable is not connected properly, Reconnect the power cable properly
3. Power fuse is blown, Replace with a new fuse
4. Power fuse is ruptured, Please contact the after-sales service
7.2 Software System Fault
1. The software cannot be started, Please contact the after-sales service.2. Network printing does not work, The device is not turned on, please restart the device
3. Other prompts appear during operation, Please record complete error information and codes and contact the post-sales service.
7.3 Print Fault
7.3.1 Abnormal Sound when the printer is working1. Other abnormal sounds
Check whether the device is loose and make sure the device is placed horizontally.
7.3.2 Sudden Stop
1. Power interruption, Please turn on the power switch again.
2. Network failure, Please unplug and plug the network cable, and restart the printer.
3. The problem still exists, Please contact the after-sales service.
7.4 Abnormal Print Result
1. Printing is not clear, Please contact the after-sales service.2. Incomplete display of printout results, Please check whether the equipment is loose.
3. For other problems, Please contact the after-sales service.
7.5 Other Fault
1. For any other problems, please contact the after-sales service.Note: Do not operate the machine until the problem is completely solved to avoid damage to the machine!